Gowhich

Durban's Blog

通常Javascript代码很多情况下是异步运行的,当代码异步运行的时候,Jest需要知道什么运行结束,然后进行下一个单元测试,Jest自身就有需要方法来处理这个。下面记录如下

项目初始化【这里还是之前的项目,省的在配置麻烦】

项目地址

1
2
https://github.com/durban89/webpack4-react16-reactrouter-demo.git
tag:v_1.0.16

拉取

1
2
3
4
5
git clone https://github.com/durban89/webpack4-react16-reactrouter-demo.git 
cd webpack4-react16-reactrouter-demo
git fetch origin
git checkout v_1.0.16
npm install

Async/Await

上篇文章分享了关于异步测试的,这里继续分享下使用Async/Await进行异步测试

使用Async/Await写测试只需要在写测试的时候在function前面加入async关键字就可以了,比如下面的测试

1
2
3
4
5
6
7
8
9
10
11
12
13
14
15
16
17
18
19
20
21
22
23
const fetchData = (err) => {
const promise = new Promise((resolve, reject) => {
if (err) {
return reject('error');
}

return setTimeout(() => resolve('gowhich'), 3000);
});
return promise;
};

test('data的数据是"gowhich"', async () => {
const data = await fetchData();
expect(data).toBe('gowhich');
});

test('获取数据失败', async () => {
try {
await fetchData(true);
} catch (err) {
expect(err).toBe('error');
}
});

也可以将async/await和.resolves或者.rejects结合来使用,如下

1
2
3
4
5
6
7
8
9
10
11
12
13
14
15
16
17
18
const fetchData = (err) => {
const promise = new Promise((resolve, reject) => {
if (err) {
return reject('error');
}

return setTimeout(() => resolve('gowhich'), 3000);
});
return promise;
};

test('data的数据是"gowhich"', async () => {
await expect(fetchData()).resolves.toBe('gowhich');
});

test('获取数据失败', async () => {
await expect(fetchData(true)).rejects.toMatch('error');
});

执行npm test,得到的结果如下

1
2
3
4
5
6
7
8
9
10
11
12
13
14
15
> xx@xx test /Users/durban/nodejs/webpack-react-demo
> jest --notify --watchman=false

PASS src/__tests__/jest_async_callback.test.js
PASS src/__tests__/CheckboxWithLabelComponent.test.jsx
PASS src/__tests__/jest_common.test.js
PASS src/__tests__/sum.test.js
PASS src/__tests__/jest_async_promise.test.js (6.718s)
PASS src/__tests__/jest_async_await.test.js (8.424s)

Test Suites: 6 passed, 6 total
Tests: 22 passed, 22 total
Snapshots: 0 total
Time: 10.927s
Ran all test suites.

在这些情况下,async和await实际上只是与promises示例使用的相同逻辑的语法糖。

这些形式都不是特别优于其他形式,您可以在代码库或甚至单个文件中混合使用它们。

这取决于哪种风格可以让你的测试更简单。

项目地址

1
2
https://github.com/durban89/webpack4-react16-reactrouter-demo.git
tag:v_1.0.17

通常Javascript代码很多情况下是异步运行的,当代码异步运行的时候,Jest需要知道什么运行结束,然后进行下一个单元测试,Jest自身就有需要方法来处理这个。下面记录如下

项目初始化【这里还是之前的项目,省的在配置麻烦】

项目地址

1
2
https://github.com/durban89/webpack4-react16-reactrouter-demo.git
tag:v_1.0.15

拉取

1
2
3
4
5
git clone https://github.com/durban89/webpack4-react16-reactrouter-demo.git 
cd webpack4-react16-reactrouter-demo
git fetch origin
git checkout v_1.0.15
npm install

Callbacks

一般情况下,Javascript的异步模式是通过Callbacks进行的

比如有一个函数fetchData(callback)是用来获取数据的,获取完数据回调callback(data),这里测试的时候返回的数据是一个字符串”peanut butter”

默认情况下,一旦Jest测试到达执行结束,它就会完成测试。这意味着下面这个测试不会按预期工作:

1
2
3
4
5
6
7
8
9
10
11
12
13
14
15
function fetchData(callback) {
setTimeout(() => {
callback('peanut butter');
}, 1000);
}

// Don't do this!
test('one section the data is peanut butter', () => {
function callback(data) {
console.log('one section data = ', data);
expect(data).toBe('peanut butter');
}

fetchData(callback);
});

执行 npm test 得到如下结果

1
2
3
4
5
6
7
8
9
10
11
12
13
> xx@xx test /Users/durban/nodejs/webpack-react-demo
> jest --notify --watchman=false

PASS src/__tests__/jest_async.test.js
PASS src/__tests__/CheckboxWithLabelComponent.test.jsx
PASS src/__tests__/jest_common.test.js
PASS src/__tests__/sum.test.js

Test Suites: 4 passed, 4 total
Tests: 14 passed, 14 total
Snapshots: 0 total
Time: 2.376s, estimated 3s
Ran all test suites.

从上面可以看出并没有打印出我们console.log要输出的内容,问题在于,还有没有等到fetchData执行完,测试就已经完成了。

针对这个问题,有一种替代形式的测试可以解决这个问题。就是不要将测试放入带有空参数的函数中,而应使用称为done的单个参数。Jest将在完成测试之前等待完成回调。如下

1
2
3
4
5
6
7
8
9
10
11
12
13
14
15
function fetchData(callback) {
setTimeout(() => {
callback('peanut butter');
}, 1000);
}

test('two section the data is peanut butter', (done) => {
function callback(data) {
console.log('two section data = ', data);
expect(data).toBe('peanut butter');
done();
}

fetchData(callback);
});

执行 npm test 得到如下结果

1
2
3
4
5
6
7
8
9
10
11
12
13
14
15
16
17
18
> xx@xx test /Users/durban/nodejs/webpack-react-demo
> jest --notify --watchman=false

PASS src/__tests__/jest_async.test.js
● Console

console.log src/__tests__/jest_async.test.js:19
two section data = peanut butter

PASS src/__tests__/CheckboxWithLabelComponent.test.jsx
PASS src/__tests__/jest_common.test.js
PASS src/__tests__/sum.test.js

Test Suites: 4 passed, 4 total
Tests: 14 passed, 14 total
Snapshots: 0 total
Time: 3.438s
Ran all test suites.

跟上一个对比的话多了如下的输出代码

1
2
3
4
● Console

console.log src/__tests__/jest_async.test.js:19
two section data = peanut butter

如果done()永远不会被调用,那么测试会失败。

Promises

如果代码里面使用Promises的话,有一个非常简单的方法来进行异步测试,只需要在测试中返回一个promise就可以了,Jest将等到promise调用resolve,如果promise是reject,则测试结果失败。如下例子,将callback的函数替换为promise的函数

1
2
3
4
5
6
7
8
9
10
11
12
13
14
15
16
17
18
19
20
21
22
23
24
25
26
27
28
const fetchData = (err) => {
const promise = new Promise((resolve, reject) => {
if (err) {
return reject('error');
}

return setTimeout(() => resolve('peanut butter'), 3000);
});
return promise;
};

test('the data is peanut butter', () => {
const promise = fetchData().then((data) => {
// console.log('third section data = ', data);
expect(data).toBe('peanut butter');
});

return promise;
});

test('the fetch fails with an error', () => {
expect.assertions(1);
const promise = fetchData(true).catch((err) => {
expect(err).toMatch('error');
});

return promise;
});

一定要确定返回的是一个promise,不行Jest会在fetchData完成之前先完成。

如果期望promise是reject,使用.catch方法,确保添加了expect.assertions去验证产生了一定数量的assertions被调用,否则一个fulfilled promise的测试将会失败

.resolves / .rejects

除了上面简单的方法还可以在测试语句中使用.resolves / .rejects

.resolves matcher如下

1
2
3
4
test('the data is peanut butter', () => {
const promise = expect(fetchData()).resolves.toBe('peanut butter');
return promise;
});

.rejects matcher如下

1
2
3
4
test('the fetch fails with an error', () => {
const promise = expect(fetchData(true)).rejects.toMatch('error');
return promise;
});

项目地址

1
2
https://github.com/durban89/webpack4-react16-reactrouter-demo.git
tag:v_1.0.16

项目初始化【这里还是之前的项目,省的在配置麻烦】

项目地址

1
2
3
https://github.com/durban89/webpack4-react16-reactrouter-demo.git

tag:v_1.0.14

拉取

1
2
3
4
5
6
7
8
9
git clone https://github.com/durban89/webpack4-react16-reactrouter-demo.git

cd webpack4-react16-reactrouter-demo

git fetch origin

git checkout v_1.0.14

npm install

普通的Matchers

src/__tests__/jest_common.test.js

1
2
3
test('two plus two is four', () => {
expect(2 + 2).toBe(4);
});

运行npm test

1
2
3
4
5
6
7
8
9
10
11
12
13
14
$ npm test

> xx@xx test /Users/durban/nodejs/webpack-react-demo
> jest --notify --watchman=false

PASS src/__tests__/sum.test.js
PASS src/__tests__/jest_common.test.js
PASS src/__tests__/CheckboxWithLabelComponent.test.jsx

Test Suites: 3 passed, 3 total
Tests: 3 passed, 3 total
Snapshots: 0 total
Time: 2.963s
Ran all test suites.

在上面的代码中expect(2+2)返回了一个”expectation”对象,这些”expectation”对象除了调用matchers之外不会做太多其他的事情,上面代码中”.toBe(4)”就是一个matchers.当jest运行时,他会捕获所有失败了的matchers,然后打印出比较友好的错误信息。

“toBe”使用Object.is去测试是否相等。如果想要检查对象的值是否相等,可以使用”toEqual”代替.

1
2
3
4
5
test('object assignment', () => {
const data = {one: 1};
data['two'] = 2;
expect(data).toEqual({one: 1, two: 2});
});

toEqual会用递归的方式检查object或array每个值

也可以使用matchers的相反的方式进行测试

1
2
3
4
5
6
7
test('adding positive numbers is not zero', () => {
for (let a = 1; a < 10; a += 1) {
for (let b = 1; b < 10; b += 1) {
expect(a + b).not.toBe(0);
}
}
});

在测试中有时候需要去判断”undefined”,”null”和”false”的区别,但是有时候又不想区分他们,Jest提供了帮助,从而实现测试中自己想要的情况

  • toBeNull只匹配 null
  • toBeUndefined只匹配 undefined
  • toBeDefined是跟toBeUndefined相反
  • toBeTruthy匹配任何if条件认为true的
  • toBeFalsy匹配任何if条件认为false的

比如下面

1
2
3
4
5
6
7
8
9
10
11
12
13
14
15
16
17
test('null', () => {
const n = null;
expect(n).toBeNull();
expect(n).toBeDefined();
expect(n).not.toBeUndefined();
expect(n).not.toBeTruthy();
expect(n).toBeFalsy();
});

test('zero', () => {
const z = 0;
expect(z).not.toBeNull();
expect(z).toBeDefined();
expect(z).not.toBeUndefined();
expect(z).not.toBeTruthy();
expect(z).toBeFalsy();
});

下面看看其他的一些matchers

Numbers

大多数数字的比较方法都有等价的Matchers。

1
2
3
4
5
6
7
8
9
10
11
test('two plus two', () => {
const value = 2 + 2;
expect(value).toBeGreaterThan(3);
expect(value).toBeGreaterThanOrEqual(3.5);
expect(value).toBeLessThan(5);
expect(value).toBeLessThanOrEqual(4.5);

// toBe and toEqual are equivalent for numbers
expect(value).toBe(4);
expect(value).toEqual(4);
});

对于浮点数,我们不希望出现四舍五入的错误情况,因此判断小数的是否相等的时候,使用”toBeCloseTo”代替”toEqual”,如下

1
2
3
4
test('adding floating point numbers', () => {
const value = 0.1 + 0.2;
expect(value).toBeCloseTo(0.3);
});

Strings

可以使用toMatch在正则表达式中检查字符串

1
2
3
4
5
6
7
test('there is no I in team', () => {
expect('team').not.toMatch(/I/);
});

test('but there is a "stop" in Christoph', () => {
expect('Christoph').toMatch(/stop/);
});

Arrays

可以使用toContain检查数组是否包含特定项目

1
2
3
4
5
6
7
8
9
10
11
const shoppingList = [
'diapers',
'kleenex',
'trash bags',
'paper towels',
'beer',
];

test('the shopping list has beer on it', () => {
expect(shoppingList).toContain('beer');
});

Exceptions

如果想测试某个特定函数在调用时会抛出错误,请使用toThrow

1
2
3
4
5
6
7
8
9
10
11
12
test('compiling android goes as expected', () => {
function compileAndroidCode() {
throw new Error('you are useing the wrong JDK');
}

expect(compileAndroidCode).toThrow();
expect(compileAndroidCode).toThrow(Error);

// 匹配错误信息
expect(compileAndroidCode).toThrow('you are useing the wrong JDK');
expect(compileAndroidCode).toThrow(/JDK/);
});

上面的全部测试案例测试结果如下

1
2
3
4
5
6
7
8
9
10
11
12
13
14
$ npm test

> xx@xx test /Users/durban/nodejs/webpack-react-demo
> jest --notify --watchman=false

PASS src/__tests__/jest_common.test.js
PASS src/__tests__/CheckboxWithLabelComponent.test.jsx
PASS src/__tests__/sum.test.js

Test Suites: 3 passed, 3 total
Tests: 13 passed, 13 total
Snapshots: 0 total
Time: 2.752s
Ran all test suites.

项目地址

1
2
3
https://github.com/durban89/webpack4-react16-reactrouter-demo.git

tag:v_1.0.15

安装 enzyme 相关

1
2
3
4
5
npm install enzyme enzyme-adapter-react-16 --save-dev

npm install jest babel-jest babel-preset-env react-test-renderer --save-dev

npm install enzyme-to-json

修改package.json

1
"test": "jest --notify --watchman=false",

这里强调记录下,为什么要加–watchman=false,因为在国内watchman连接的会会超时,别问我怎么知道的,我可以给你解释102个小时,反正在国内的话就按照我说的这个来,不然,你会和郁闷

1
分别添加jest.config.js和jest.setup.js

jest.config.js

1
2
3
4
module.exports = {
setupFiles: ['./jest.setup.js'],
snapshotSerializers: ['enzyme-to-json/serializer'],
};

jest.setup.js

1
2
3
4
5
6
import { configure } from 'enzyme';
import Adapter from 'enzyme-adapter-react-16';

configure({
adapter: new Adapter(),
});

为什么会有jest.setup.js,官网的是在测试文件中其实是可以直接加

1
2
3
4
5
6
import { configure } from 'enzyme';
import Adapter from 'enzyme-adapter-react-16';

configure({
adapter: new Adapter(),
});

这段代码的,但是为了不重复操作,有的人把这段代码提出来,放到一个单独的文件中,这个也是jest配置文件支持的,这点做的很好

测试用例

src/lib/sum.js

1
2
3
4
function sum(a, b) {
return a + b;
}
module.exports = sum;

src/__tests__/sum.test.js

1
2
3
4
5
const sum = require('../lib/sum');

test('adds 1 + 2 to equal 3', () => {
expect(sum(1, 2)).toBe(3);
});

执行jest进行测试

1
2
3
4
5
6
7
8
9
10
11
12
13
$ npm test

> xx@xx test /Users/durban/nodejs/webpack-react-demo
> jest --notify --watchman=false

PASS src/__tests__/sum.test.js
✓ adds 1 + 2 to equal 3 (4ms)

Test Suites: 1 passed, 1 total
Tests: 1 passed, 1 total
Snapshots: 0 total
Time: 2.348s
Ran all test suites.

为什么要把测试案例放到目录__tests__

默认jest会扫描testMatch匹配的文件,而忽略testPathIgnorePatterns匹配的文件,具体的可在配置文件更改

1
2
testMatch: **/__tests__/**/*.js?(x),**/?(*.)+(spec|test).js?(x)
testPathIgnorePatterns: /node_modules/

React组件测试用例

src/components/CheckboxWithLabelComponent.jsx

1
2
3
4
5
6
7
8
9
10
11
12
13
14
15
16
17
18
19
20
21
22
23
24
25
26
27
28
29
30
31
32
33
34
35
36
37
38
39
40
import React from 'react';
import PropTypes from 'prop-types';

class CheckboxWithLabelComponent extends React.Component {
constructor(props, context) {
super(props, context);

this.state = {
isChecked: false,
};

this.onChange = this.onChange.bind(this);
}

onChange() {
this.setState({
isChecked: !this.state.isChecked,
});
}

render() {
return (
<label htmlFor="label">
<input
type="checkbox"
checked={this.state.isChecked}
onChange={this.onChange}
/>
{this.state.isChecked ? this.props.labelOn : this.props.labelOff}
</label>
);
}
}

CheckboxWithLabelComponent.propTypes = {
labelOn: PropTypes.string.isRequired,
labelOff: PropTypes.string.isRequired,
};

export default CheckboxWithLabelComponent;

src/__tests__/CheckboxWithLabelComponent.test.jsx

1
2
3
4
5
6
7
8
9
10
11
12
13
14
import React from 'react';
import { shallow } from 'enzyme';
import CheckboxWithLabelComponent from '../components/CheckboxWithLabelComponent';

test('CheckboxWithLabelComponent changes the text after click', () => {
// Render a checkbox with label in the document
const checkbox = shallow(<CheckboxWithLabelComponent labelOn="On" labelOff="Off" />);

expect(checkbox.text()).toEqual('Off');

checkbox.find('input').simulate('change');

expect(checkbox.text()).toEqual('On');
});

执行jest进行测试

1
2
3
4
5
6
7
8
9
10
11
12
13
$ npm test

> xx@xx test /Users/durban/nodejs/webpack-react-demo
> jest --notify --watchman=false

PASS src/__tests__/sum.test.js
PASS src/__tests__/CheckboxWithLabelComponent.test.jsx

Test Suites: 2 passed, 2 total
Tests: 2 passed, 2 total
Snapshots: 0 total
Time: 2.188s
Ran all test suites.

是不是很赞。原来前端也可以这么牛逼。

.babelrc也别忘记修改

presets中添加”env”

1
2
3
4
5
6
"presets": [
"es2015",
"react",
"stage-0",
"env"
]

项目地址

1
2
https://github.com/durban89/webpack4-react16-reactrouter-demo.git
tag:v_1.0.14

TypeScript 是 JavaScript 的超集,为其增加了类型系统,可以编译为普通的 JavaScript 代码。这篇文章里我们将时间 webpack 是如何跟 TypeScript 进行集成。

一如既往的创建项目的流程

1
2
3
4
mkdir webpack4-typescript-demo
cd webpack4-typescript-demo
npm init -y
npm install webpack webpack-cli --save-dev

构建项目,目录结构如下

1
2
3
4
├── package.json
├── src
│ └── index.tsx
└── webpack.config.js

基础安装

首先,执行以下命令,安装 TypeScript 编译器和需要的loader:

1
npm install --save-dev typescript ts-loader

现在,我们将修改目录结构和配置文件:

1
2
3
4
5
├── package.json
├── src
│ └── index.tsx
├── tsconfig.json
└── webpack.config.js

设置一个基本的配置,来支持 JSX,并将 TypeScript 编译到 ES5
tsconfig.json内容如下

1
2
3
4
5
6
7
8
9
10
{
"compilerOptions": {
"outDir": "./dist/",
"noImplicitAny": true,
"module": "es6",
"target": "es5",
"jsx": "react",
"allowJs": true
}
}

在 webpack 配置中处理 TypeScript
webpack.config.js

1
2
3
4
5
6
7
8
9
10
11
12
13
14
15
16
17
18
19
20
21
const path = require('path');

module.exports = {
entry: './src/index.tsx',
module: {
rules: [
{
test: /\.tsx?$/,
use: 'ts-loader',
exclude: /node_modules/
}
]
},
resolve: {
extensions: [ '.tsx', '.ts', '.js' ]
},
output: {
filename: 'bundle.js',
path: path.resolve(__dirname, 'dist')
}
};

这会直接将 webpack 的入口起点指定为 ./index.tsx,然后通过 ts-loader _加载所有的 .ts 和 .tsx 文件,并且在当前目录输出_一个 bundle.js 文件。

ts-loader
为什么使用 ts-loader,因为它能够很方便地启用额外的 webpack 功能,例如将其他 web 资源导入到项目中。

source-map
要启用 source map,我们必须配置 TypeScript,以将内联的 source map 输出到编译过的 JavaScript 文件。必须在 TypeScript 配置中添加下面这行:
tsconfig.json

1
2
3
4
5
6
7
8
9
10
11
{
"compilerOptions": {
"outDir": "./dist/",
"noImplicitAny": true,
"module": "es6",
"sourceMap": true, // 添加这行
"target": "es5",
"jsx": "react",
"allowJs": true
}
}

然后配置webpack,告诉 webpack 提取这些 source map,并内联到最终的 bundle 中。
添加如下

1
devtool: 'inline-source-map',

代码
webpack.config.js

1
2
3
4
5
6
7
8
9
10
11
12
13
14
15
16
17
18
19
20
21
22
const path = require('path');

module.exports = {
entry: './src/index.tsx',
devtool: 'inline-source-map',
module: {
rules: [
{
test: /\.tsx?$/,
use: 'ts-loader',
exclude: /node_modules/
}
]
},
resolve: {
extensions: [ '.tsx', '.ts', '.js' ]
},
output: {
filename: 'bundle.js',
path: path.resolve(__dirname, 'dist')
}
};

如何使用第三方库

当从 npm 安装第三方库时,一定要牢记同时安装这个库的类型声明文件。你可以从 TypeSearch[http://microsoft.github.io/TypeSearch/] 中找到并安装这些第三方库的类型声明文件。
举个例子,如果想安装 lodash 这个库的类型声明文件,我们可以运行下面的命令:

1
npm install --save-dev @types/lodash

动手写实例

当前项目目录结构如下

1
2
3
4
5
6
7
├── dist
│ └── index.html
├── package.json
├── src
│ └── index.tsx
├── tsconfig.json
└── webpack.config.js

添加dist/index.html

1
2
3
4
5
6
7
8
9
10
11
12
<!doctype html>
<html>

<head>
<title>Webpack - TypeScript</title>
</head>

<body>
<script src="./bundle.js"></script>
</body>

</html>

src/index.tsx内容如下

1
2
3
4
5
6
7
8
9
import * as _ from "lodash";

function component() {
var element = document.createElement('div');
element.innerHTML = _.padStart("Hello TypeScript!", 20, "-");
return element;
}

document.body.appendChild(component());

运行

1
npm run build

dist目录会多一个dist文件
使用浏览器打开dist/index.html
会看到输出如下内容

1
---Hello TypeScript!

项目地址

1
https://github.com/durban89/webpack4-typescript-demo.git

什么是渐进式网络应用程序

渐进式网络应用程序(Progressive Web Application - PWA),是一种可以提供类似于原生应用程序(native app)体验的网络应用程序(web app)。PWA 可以用来做很多事。其中最重要的是,在离线(offline)时应用程序能够继续运行功能。这是通过使用名为 Service Workers[https://developers.google.com/web/fundamentals/primers/service-workers/] 的网络技术来实现的。

到目前为止,我们一直是直接查看本地文件系统的输出结果。通常情况下,真正的用户是通过网络访问网络应用程序;用户的浏览器会与一个提供所需资源(例如,.html, .js 和 .css 文件)的服务器通讯。

那么让我们来使用一个简易服务器,搭建出我们所需的离线体验。我们将使用 http-server package 包:

1
npm install http-server --save-dev

还要修改 package.json 的 scripts 部分,来添加一个 server:run 脚本:

操作之前如果本地没有实践项目的话,可以使用之前分享的项目来实践,具体操作如下

1
2
git clone https://github.com/durban89/webpack4-react16-reactrouter-demo.git react-webpack-demo && cd react-webpack-demo
npm install

操作完后继续如下操作
在package.json中添加如下

1
"server:run": "npx http-server dist"

添加完后类似如下

1
2
3
4
5
6
7
"scripts": {
"test": "echo \"Error: no test specified\" && exit 1",
"build": "npx webpack --config webpack.prod.js",
"build:package": "NODE_ENV=production npx webpack --config webpack.prod.js",
"start": "npx webpack-dev-server --open --hot --config webpack.dev.js",
"server:run": "npx http-server dist"
},

我们先打包并运行下,操作如下

1
2
npm run build // 为了顺畅,可以先将webpack-bundle-analyzer关掉
npm run server:run

会有类似如下输出

1
2
3
4
5
6
7
8
> xx@xx server:run /Users/durban/nodejs/webpack-react-demo
> npx http-server dist

Starting up http-server, serving dist
Available on:
http://127.0.0.1:8081
http://172.18.0.70:8081
Hit CTRL-C to stop the server

如果你打开浏览器访问 http://127.0.0.1:8081,应该会看到在 dist 目录创建出服务,并可以访问 webpack 应用程序。如果停止服务器然后刷新,则 webpack 应用程序不再可访问。

这就是我们最终要改变的现状。“停止服务器然后刷新,仍然可以查看应用程序正常运行”

添加 Workbox
添加 workbox-webpack-plugin 插件,并调整 webpack.prod.js 文件

1
npm install workbox-webpack-plugin --save-dev

webpack.prod.js修改的地方如下
引入

1
const WorkboxWebpackPlugin = require('workbox-webpack-plugin');

plugins中添加

1
2
3
4
5
new WorkboxWebpackPlugin.GenerateSW({
clientsClaim: true,
skipWaiting: true,
exclude: [/\.map$/],
}),

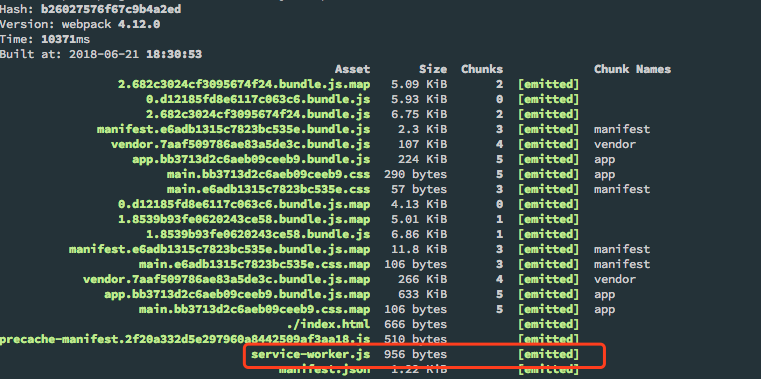
有了 Workbox,再执行 npm run build 时会发生什么,如下图


可以看到,生成了 2 个额外的文件

  • service-worker.js
  • precache-manifest.2f20a332d5e297960a8442509af3aa18.js

注册 Service Worker
修改src/index.jsx,修改添加如下代码

1
2
3
4
5
6
7
8
9
if ('serviceWorker' in navigator) {
window.addEventListener('load', () => {
navigator.serviceWorker.register('/service-worker.js').then((registration) => {
console.log('SW registered: ', registration);
}).catch((registrationError) => {
console.log('SW registration failed: ', registrationError);
});
});
}

再次运行 npm build build 来构建包含注册代码版本的应用程序。然后用

1
npm run server:run

启动服务。访问 http://127.0.0.1:8081 并查看 console 控制台。在那里你应该看到,如下图

现在来进行测试。停止服务器并刷新页面。如果浏览器能够支持 Service Worker,你应该可以看到你的应用程序还在正常运行。然而,服务器已经停止了服务,此刻是 Service Worker 在提供服务。

激动的不要不要的,此等功力果然深厚

注意:
在实践过程中,遇到几个问题
1、如何清空precache
2、如何更新precache

比如我忘记加了某个文件我要做清空怎么办?
比如我加错了某个文件想要更新怎么办?

项目地址

1
2
https://github.com/durban89/webpack4-react16-reactrouter-demo.git
tag:v_1.0.13

用交互式可缩放树形图显示webpack输出文件的大小。感觉用了之后又高大上了。

实践的上面我还是使用前面文章的项目,没有的可以按照如下的部署进行安装

1
2
git clone https://github.com/durban89/webpack4-react16-reactrouter-demo.git react-webpack-demo && cd react-webpack-demo
npm install

下面开始配置并使用webpack-bundle-analyzer

安装

1
npm install --save-dev webpack-bundle-analyzer

配置[这里只配置webpack.prod.js]
分别添加如下代码到文件中

1
2
3
4
5
6
7
const WebpackBundleAnalyzer = require('webpack-bundle-analyzer');

const {
BundleAnalyzerPlugin,
} = WebpackBundleAnalyzer;

new BundleAnalyzerPlugin()

添加后结果如下

1
2
3
4
5
6
7
8
9
10
11
12
13
14
15
16
17
18
19
20
21
22
23
24
25
26
27
28
29
30
31
32
33
34
35
36
37
38
39
40
41
42
43
44
45
46
47
48
49
50
51
52
53
54
55
56
57
58
59
60
61
62
63
64
65
66
67
68
69
70
71
72
73
74
75
76
77
78
79
80
81
82
83
84
const path = require('path');
const webpack = require('webpack');
const merge = require('webpack-merge');
const HtmlWebpackPlugin = require('html-webpack-plugin');
const CleanWebpackPlugin = require('clean-webpack-plugin');
const UglifyJsPlugin = require('uglifyjs-webpack-plugin');
const ExtractTextPlugin = require('extract-text-webpack-plugin');
const ManifestPlugin = require('webpack-manifest-plugin');
const InlineManifestWebpackPlugin = require('inline-manifest-webpack-plugin');
const WebpackBundleAnalyzer = require('webpack-bundle-analyzer');
const common = require('./webpack.common');

const {
BundleAnalyzerPlugin,
} = WebpackBundleAnalyzer;

module.exports = merge(common, {
mode: 'production',
devtool: 'source-map',
entry: {
app: [
'./src/index.jsx',
],
vendor: [
'react',
'react-dom',
'redux',
],
},
output: {
filename: '[name].[chunkhash].bundle.js',
chunkFilename: '[name].[chunkhash].bundle.js',
path: path.resolve(__dirname, 'dist'),
publicPath: '/',
},
plugins: [
new CleanWebpackPlugin(['dist']),
new HtmlWebpackPlugin({
title: 'React + ReactRouter',
filename: './index.html', // 调用的文件
template: './index.html', // 模板文件
}),
new InlineManifestWebpackPlugin(),
new UglifyJsPlugin({
sourceMap: true,
}),
new webpack.DefinePlugin({
'process.env.NODE_ENV': JSON.stringify('production'),
}),
new ExtractTextPlugin({
filename: 'main.[chunkhash].css',
}),
new ManifestPlugin(),
new webpack.NamedModulesPlugin(),
new BundleAnalyzerPlugin(),
],
optimization: {
splitChunks: {
chunks: 'initial', // 必须三选一: "initial" | "all"(默认就是all) | "async"
minSize: 0, // 最小尺寸,默认0
minChunks: 1, // 最小 chunk ,默认1
maxAsyncRequests: 1, // 最大异步请求数, 默认1
maxInitialRequests: 1, // 最大初始化请求书,默认1
name: () => {}, // 名称,此选项可接收 function
cacheGroups: { // 这里开始设置缓存的 chunks
priority: '0', // 缓存组优先级 false | object |
vendor: { // key 为entry中定义的 入口名称
chunks: 'initial', // 必须三选一: "initial" | "all" | "async"(默认就是异步)
test: /react|lodash|react-dom|redux/, // 正则规则验证,如果符合就提取 chunk
name: 'vendor', // 要缓存的 分隔出来的 chunk 名称
minSize: 0,
minChunks: 1,
enforce: true,
maxAsyncRequests: 1, // 最大异步请求数, 默认1
maxInitialRequests: 1, // 最大初始化请求书,默认1
reuseExistingChunk: true, // 可设置是否重用该chunk(查看源码没有发现默认值)
},
},
},
runtimeChunk: {
name: 'manifest',
},
},
});

运行

1
npm run build

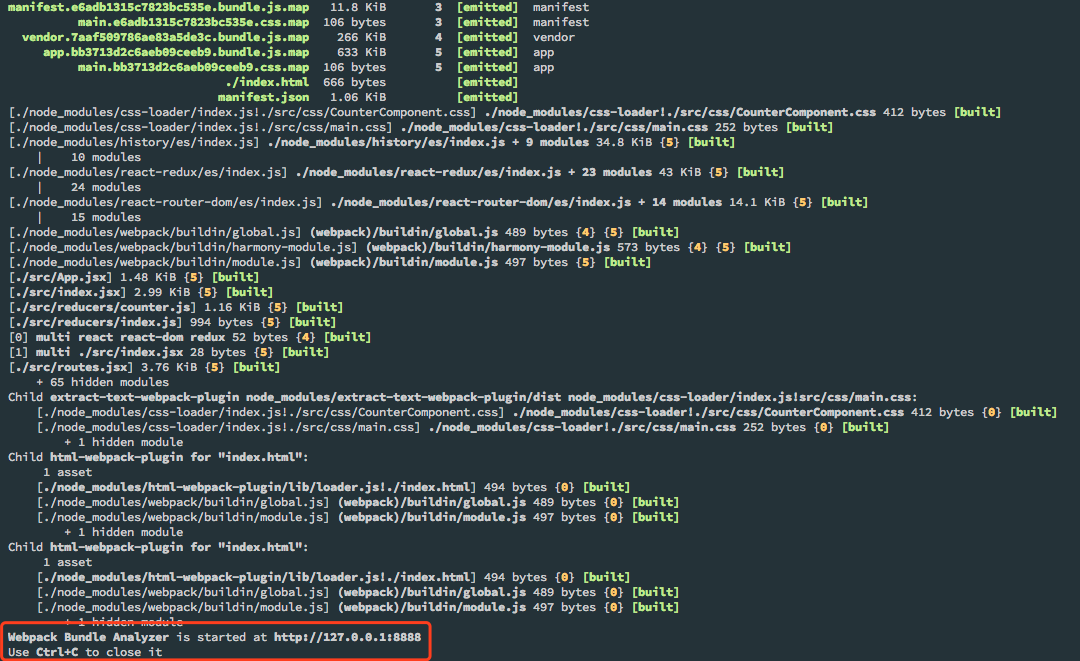
结果类似如下图

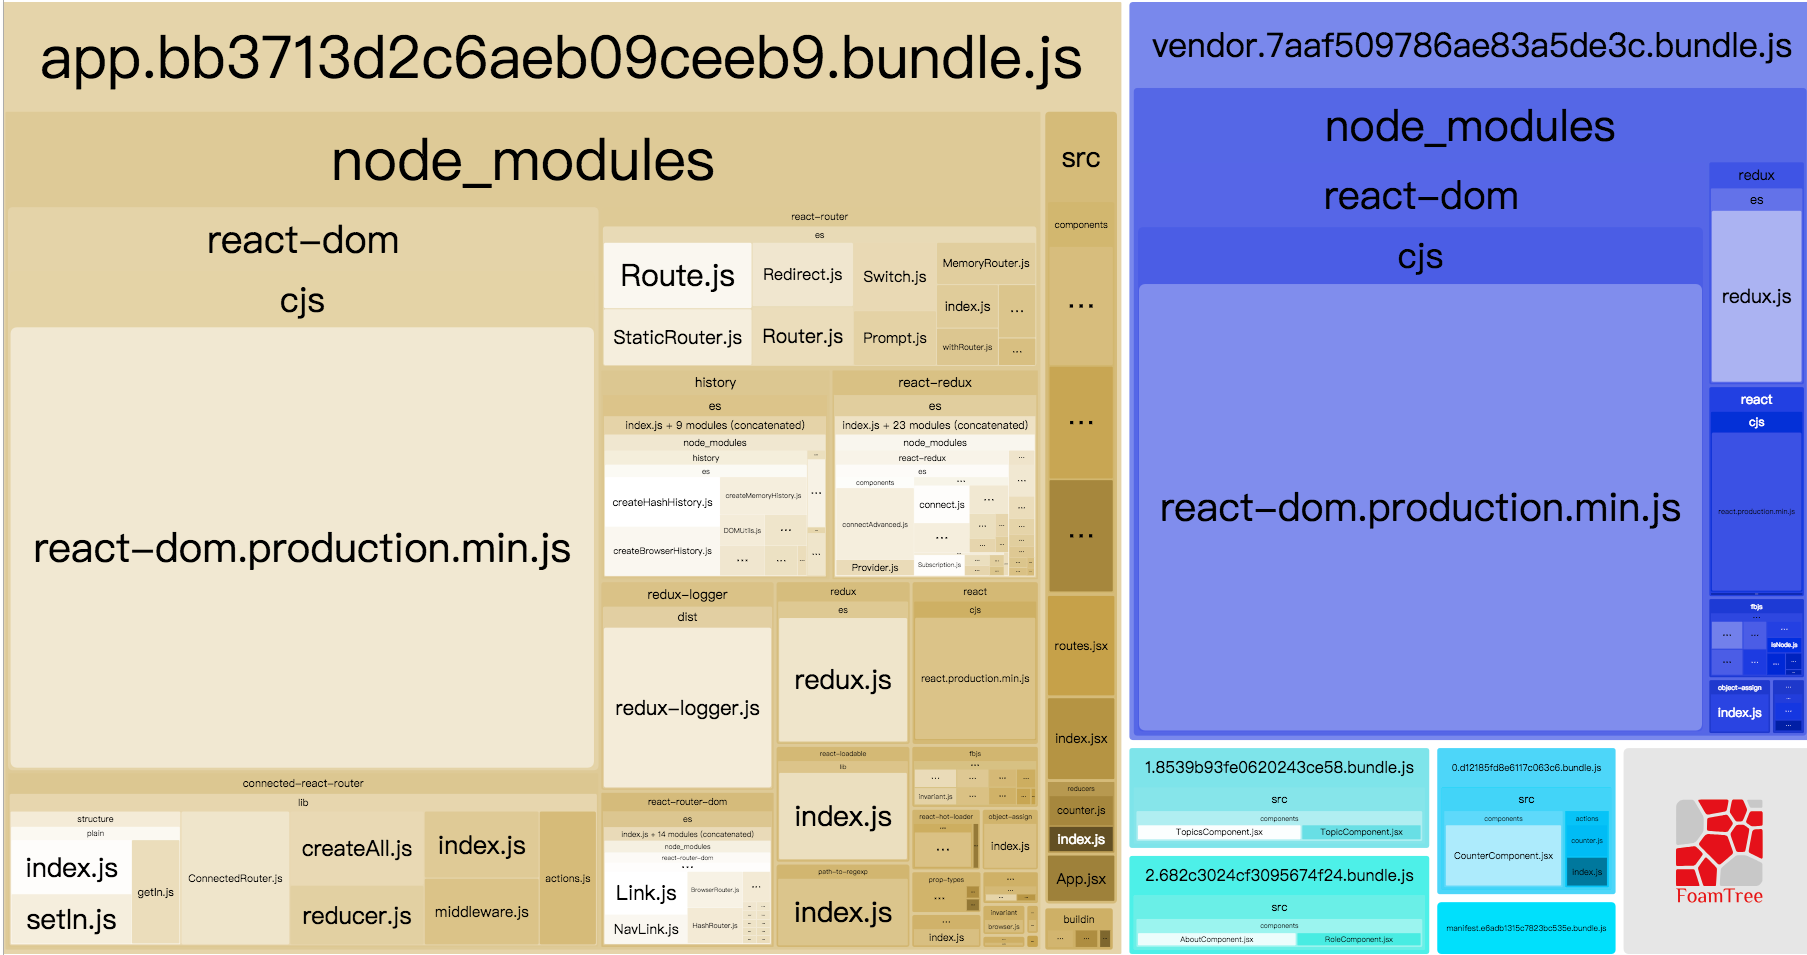
会自动打开一个浏览器,如下图


是不是很赞,以后我们就可以根据这个来分析打包的情况

我们也可以命令行的方式,操作如下[注意,需要将配置中的new BundleAnalyzerPlugin()注释掉,不然会在下面的操作执行产生冲突而卡住]

1
npx webpack --config=webpack.prod.js --profile --json > stats.json

然后执行

1
npx webpack-bundle-analyzer ./stats.json

输出如下

1
2
3
4
5
6
7
8
9
10
11
Error parsing bundle asset "/Users/durban/nodejs/webpack-react-demo/0.d12185fd8e6117c063c6.bundle.js": no such file
Error parsing bundle asset "/Users/durban/nodejs/webpack-react-demo/2.682c3024cf3095674f24.bundle.js": no such file
Error parsing bundle asset "/Users/durban/nodejs/webpack-react-demo/manifest.e6adb1315c7823bc535e.bundle.js": no such file
Error parsing bundle asset "/Users/durban/nodejs/webpack-react-demo/vendor.7aaf509786ae83a5de3c.bundle.js": no such file
Error parsing bundle asset "/Users/durban/nodejs/webpack-react-demo/app.bb3713d2c6aeb09ceeb9.bundle.js": no such file
Error parsing bundle asset "/Users/durban/nodejs/webpack-react-demo/1.8539b93fe0620243ce58.bundle.js": no such file

No bundles were parsed. Analyzer will show only original module sizes from stats file.

Webpack Bundle Analyzer is started at http://127.0.0.1:8888
Use Ctrl+C to close it

发现有错误,找不到要分析的文件,更换下执行命令

1
npx webpack-bundle-analyzer ./stats.json dist

类似如下输出

1
2
Webpack Bundle Analyzer is started at http://127.0.0.1:8888
Use Ctrl+C to close it

跟上面的类似

项目地址

1
2
https://github.com/durban89/webpack4-react16-reactrouter-demo.git
tag:v_1.0.12

Manifest干嘛用,我摘抄了下官网的一些内容如下,先来了解下

一旦你的应用程序中,如 index.html 文件、一些 bundle 和各种资源加载到浏览器中,会发生什么?你精心安排的 /src 目录的文件结构现在已经不存在,所以 webpack 如何管理所有模块之间的交互呢?这就是 manifest 数据用途的由来……

当编译器(compiler)开始执行、解析和映射应用程序时,它会保留所有模块的详细要点。这个数据集合称为 “Manifest”,当完成打包并发送到浏览器时,会在运行时通过 Manifest 来解析和加载模块。无论你选择哪种模块语法,那些 import 或 require 语句现在都已经转换为 webpack_require 方法,此方法指向模块标识符(module identifier)。通过使用 manifest 中的数据,runtime 将能够查询模块标识符,检索出背后对应的模块。

所以,现在你应该对 webpack 在幕后工作有一点了解。“但是,这对我有什么影响呢?”,你可能会问。答案是大多数情况下没有。runtime 做自己该做的,使用 manifest 来执行其操作,然后,一旦你的应用程序加载到浏览器中,所有内容将展现出魔幻般运行。然而,如果你决定通过使用浏览器缓存来改善项目的性能,理解这一过程将突然变得尤为重要。

通过使用 bundle 计算出内容散列(content hash)作为文件名称,这样在内容或文件修改时,浏览器中将通过新的内容散列指向新的文件,从而使缓存无效。一旦你开始这样做,你会立即注意到一些有趣的行为。即使表面上某些内容没有修改,计算出的哈希还是会改变。这是因为,runtime 和 manifest 的注入在每次构建都会发生变化。

什么是Runtime

runtime,以及伴随的 manifest 数据,主要是指:在浏览器运行时,webpack 用来连接模块化的应用程序的所有代码。runtime 包含:在模块交互时,连接模块所需的加载和解析逻辑。包括浏览器中的已加载模块的连接,以及懒加载模块的执行逻辑。

具体如何提取manifest前面的文章【Webpack4缓存相关配置】已经说过了。

下面我们来配置下
修改webpack.prod.js,另外如果需要webpack.dev.js的话可以另外在处理
安装

1
npm i inline-manifest-webpack-plugin -D

分别添加如下

1
2
3
4
5
6
7
const InlineManifestWebpackPlugin = require('inline-manifest-webpack-plugin');

new InlineManifestWebpackPlugin(),

runtimeChunk: {
name: 'manifest',
},

到配置文件中
最终结果如下

1
2
3
4
5
6
7
8
9
10
11
12
13
14
15
16
17
18
19
20
21
22
23
24
25
26
27
28
29
30
31
32
33
34
35
36
37
38
39
40
41
42
43
44
45
46
47
48
49
50
51
52
53
54
55
56
57
58
59
60
61
62
63
64
65
66
67
68
69
70
71
72
73
74
75
76
77
78
const path = require('path');
const webpack = require('webpack');
const merge = require('webpack-merge');
const HtmlWebpackPlugin = require('html-webpack-plugin');
const CleanWebpackPlugin = require('clean-webpack-plugin');
const UglifyJsPlugin = require('uglifyjs-webpack-plugin');
const ExtractTextPlugin = require('extract-text-webpack-plugin');
const ManifestPlugin = require('webpack-manifest-plugin');
const InlineManifestWebpackPlugin = require('inline-manifest-webpack-plugin');
const common = require('./webpack.common');

module.exports = merge(common, {
mode: 'production',
devtool: 'source-map',
entry: {
app: [
'./src/index.jsx',
],
vendor: [
'react',
'react-dom',
'redux',
],
},
output: {
filename: '[name].[chunkhash].bundle.js',
chunkFilename: '[name].[chunkhash].bundle.js',
path: path.resolve(__dirname, 'dist'),
publicPath: '/',
},
plugins: [
new CleanWebpackPlugin(['dist']),
new HtmlWebpackPlugin({
title: 'React + ReactRouter',
filename: './index.html', // 调用的文件
template: './index.html', // 模板文件
}),
new InlineManifestWebpackPlugin(),
new UglifyJsPlugin({
sourceMap: true,
}),
new webpack.DefinePlugin({
'process.env.NODE_ENV': JSON.stringify('production'),
}),
new ExtractTextPlugin({
filename: 'main.[chunkhash].css',
}),
new ManifestPlugin(),
new webpack.NamedModulesPlugin(),
],
optimization: {
splitChunks: {
chunks: 'initial', // 必须三选一: "initial" | "all"(默认就是all) | "async"
minSize: 0, // 最小尺寸,默认0
minChunks: 1, // 最小 chunk ,默认1
maxAsyncRequests: 1, // 最大异步请求数, 默认1
maxInitialRequests: 1, // 最大初始化请求书,默认1
name: () => {}, // 名称,此选项可接收 function
cacheGroups: { // 这里开始设置缓存的 chunks
priority: '0', // 缓存组优先级 false | object |
vendor: { // key 为entry中定义的 入口名称
chunks: 'initial', // 必须三选一: "initial" | "all" | "async"(默认就是异步)
test: /react|lodash|react-dom|redux/, // 正则规则验证,如果符合就提取 chunk
name: 'vendor', // 要缓存的 分隔出来的 chunk 名称
minSize: 0,
minChunks: 1,
enforce: true,
maxAsyncRequests: 1, // 最大异步请求数, 默认1
maxInitialRequests: 1, // 最大初始化请求书,默认1
reuseExistingChunk: true, // 可设置是否重用该chunk(查看源码没有发现默认值)
},
},
},
runtimeChunk: {
name: 'manifest',
},
},
});

运行

1
npm run build

执行后输出大概如下

1
2
3
4
5
6
7
8
9
10
11
12
13
14
15
16
17
18
19
20
21
22
23
Hash: b26027576f67c9b4a2ed
Version: webpack 4.12.0
Time: 11329ms
Built at: 2018-06-21 15:44:30
Asset Size Chunks Chunk Names
1.8539b93fe0620243ce58.bundle.js.map 5.01 KiB 1 [emitted]
0.d12185fd8e6117c063c6.bundle.js 5.93 KiB 0 [emitted]
2.682c3024cf3095674f24.bundle.js 6.75 KiB 2 [emitted]
manifest.e6adb1315c7823bc535e.bundle.js 2.3 KiB 3 [emitted] manifest
vendor.7aaf509786ae83a5de3c.bundle.js 107 KiB 4 [emitted] vendor
app.bb3713d2c6aeb09ceeb9.bundle.js 224 KiB 5 [emitted] app
main.bb3713d2c6aeb09ceeb9.css 290 bytes 5 [emitted] app
main.e6adb1315c7823bc535e.css 57 bytes 3 [emitted] manifest
0.d12185fd8e6117c063c6.bundle.js.map 4.13 KiB 0 [emitted]
1.8539b93fe0620243ce58.bundle.js 6.86 KiB 1 [emitted]
2.682c3024cf3095674f24.bundle.js.map 5.09 KiB 2 [emitted]
manifest.e6adb1315c7823bc535e.bundle.js.map 11.8 KiB 3 [emitted] manifest
main.e6adb1315c7823bc535e.css.map 106 bytes 3 [emitted] manifest
vendor.7aaf509786ae83a5de3c.bundle.js.map 266 KiB 4 [emitted] vendor
app.bb3713d2c6aeb09ceeb9.bundle.js.map 633 KiB 5 [emitted] app
main.bb3713d2c6aeb09ceeb9.css.map 106 bytes 5 [emitted] app
./index.html 666 bytes [emitted]
manifest.json 1.06 KiB [emitted]

我们看下dist/index.html这个文件

1
2
3
4
5
6
7
8
9
10
11
12
<!DOCTYPE html>
<html>
<head>
<meta charset="utf-8" />
<meta http-equiv="X-UA-Compatible" content="IE=edge">
<title>React + ReactRouter Demo</title>
<meta name="viewport" content="width=device-width, initial-scale=1">
<link href="/main.e6adb1315c7823bc535e.css" rel="stylesheet"><link href="/main.bb3713d2c6aeb09ceeb9.css" rel="stylesheet"></head>
<body>
<div id="root"></div>
<script type="text/javascript" src="/manifest.e6adb1315c7823bc535e.bundle.js"></script><script type="text/javascript" src="/app.bb3713d2c6aeb09ceeb9.bundle.js"></script><script type="text/javascript" src="/vendor.7aaf509786ae83a5de3c.bundle.js"></script></body>
</html>

可以看到

1
/manifest.e6adb1315c7823bc535e.bundle.js

已经被加入了

这样当模块被打包并运输到浏览器上时,runtime就会根据manifest文件来处理和加载模块。利用manifest就知道从哪里去获取模块代码。

项目地址

1
2
https://github.com/durban89/webpack4-react16-reactrouter-demo.git
tag:v_1.0.11

关于webpack的缓存相关配置,我用我之前文章的项目来做下实践

1
2
git clone https://github.com/durban89/webpack4-react16-reactrouter-demo.git react-webpack-demo && cd react-webpack-demo
npm install

提取模板(Extracting Boilerplate)

1
npm install --save-dev webpack-manifest-plugin

添加如下代码
引入

1
const ManifestPlugin = require('webpack-manifest-plugin');

在plugins中加入

1
new ManifestPlugin(),

plugins中结果如下

1
2
3
4
5
6
7
8
9
10
11
12
13
14
15
plugins: [
new CleanWebpackPlugin(['dist']),
new HtmlWebpackPlugin({
title: 'React + ReactRouter Demo',
filename: './index.html', // 调用的文件
template: './index.html', // 模板文件
}),
new webpack.DefinePlugin({
'process.env.NODE_ENV': JSON.stringify('development'),
}),
new ExtractTextPlugin({
filename: '[name].[hash].bundle.css',
}),
new ManifestPlugin(),
],

1
2
3
new ExtractTextPlugin({
filename: '[name].bundle.css',
}),

改为

1
2
3
new ExtractTextPlugin({
filename: '[name].[hash].bundle.css',
}),

再将

1
2
3
4
5
6
output: {
filename: '[name].bundle.js',
chunkFilename: '[name].bundle.js',
path: path.resolve(__dirname, 'dist'),
publicPath: '/',
},

改为

1
2
3
4
5
6
output: {
filename: '[name].[hash].bundle.js',
chunkFilename: '[name].[hash].bundle.js',
path: path.resolve(__dirname, 'dist'),
publicPath: '/',
},

这次我们执行

1
npx webpack --config webpack.dev.js

然后看下打包效果

1
2
3
4
5
6
7
8
9
10
11
12
Hash: 88fb183afd5b8cdbb10b
Version: webpack 4.12.0
Time: 2748ms
Built at: 2018-06-14 17:43:46
Asset Size Chunks Chunk Names
app.88fb183afd5b8cdbb10b.bundle.js 1.17 MiB app [emitted] app
0.88fb183afd5b8cdbb10b.bundle.js 10.9 KiB 0 [emitted]
1.88fb183afd5b8cdbb10b.bundle.js 11 KiB 1 [emitted]
2.88fb183afd5b8cdbb10b.bundle.js 10.1 KiB 2 [emitted]
app.88fb183afd5b8cdbb10b.bundle.css 233 bytes app [emitted] app
./index.html 439 bytes [emitted]
manifest.json 366 bytes [emitted]

多了一个manifest.json
在项目目录下面查看下这个文件

1
cat ./dist/manifest.json
1
2
3
4
5
6
7
8
{
"app.js": "/app.88fb183afd5b8cdbb10b.bundle.js",
"app.css": "/app.88fb183afd5b8cdbb10b.bundle.css",
"0.88fb183afd5b8cdbb10b.bundle.js": "/0.88fb183afd5b8cdbb10b.bundle.js",
"1.88fb183afd5b8cdbb10b.bundle.js": "/1.88fb183afd5b8cdbb10b.bundle.js",
"2.88fb183afd5b8cdbb10b.bundle.js": "/2.88fb183afd5b8cdbb10b.bundle.js",
"./index.html": "/./index.html"
}

这个文件干嘛用,后面说

根据官方的说法

将第三方库(library)(例如 lodash 或 react)提取到单独的 vendor chunk 文件中,是比较推荐的做法,这是因为,它们很少像本地的源代码那样频繁修改。因此通过实现以上步骤,利用客户端的长效缓存机制,可以通过命中缓存来消除请求,并减少向服务器获取资源,同时还能保证客户端代码和服务器端代码版本一致。

但是目前官网的实例不起作用了,经过我的实践当前webpack的版本已经使用了新的逻辑,具体操作如下
我们先配置webpack.dev.js
添加如下配置

1
2
3
4
5
6
7
8
9
10
11
12
13
14
15
16
17
18
19
20
21
22
23
24
optimization: {
splitChunks: {
chunks: 'initial', // 必须三选一: "initial" | "all"(默认就是all) | "async"
minSize: 0, // 最小尺寸,默认0
minChunks: 1, // 最小 chunk ,默认1
maxAsyncRequests: 1, // 最大异步请求数, 默认1
maxInitialRequests: 1, // 最大初始化请求书,默认1
name: () => {}, // 名称,此选项可接收 function
cacheGroups: { // 这里开始设置缓存的 chunks
priority: '0', // 缓存组优先级 false | object |
vendor: { // key 为entry中定义的 入口名称
chunks: 'initial', // 必须三选一: "initial" | "all" | "async"(默认就是异步)
test: /react|lodash/, // 正则规则验证,如果符合就提取 chunk
name: 'vendor', // 要缓存的 分隔出来的 chunk 名称
minSize: 0,
minChunks: 1,
enforce: true,
maxAsyncRequests: 1, // 最大异步请求数, 默认1
maxInitialRequests: 1, // 最大初始化请求书,默认1
reuseExistingChunk: true, // 可设置是否重用该chunk(查看源码没有发现默认值)
},
},
},
},

entry中加入

1
2
3
4
5
vendor: [
'react',
'react-dom',
'redux',
],

然后执行

1
npx webpack --config webpack.dev.js

得到类似如下输出

1
2
3
4
5
6
7
8
9
10
11
12
13
Hash: 29ff4803e0ac98b32c1c
Version: webpack 4.12.0
Time: 2641ms
Built at: 2018-06-14 17:51:36
Asset Size Chunks Chunk Names
app.29ff4803e0ac98b32c1c.bundle.js 1.17 MiB app [emitted] app
vendor.29ff4803e0ac98b32c1c.bundle.js 735 KiB vendor [emitted] vendor
0.29ff4803e0ac98b32c1c.bundle.js 10.9 KiB 0 [emitted]
1.29ff4803e0ac98b32c1c.bundle.js 11 KiB 1 [emitted]
2.29ff4803e0ac98b32c1c.bundle.js 10.1 KiB 2 [emitted]
app.29ff4803e0ac98b32c1c.bundle.css 233 bytes app [emitted] app
./index.html 524 bytes [emitted]
manifest.json 423 bytes [emitted]

多了一个vendor.29ff4803e0ac98b32c1c.bundle.js这个文件 同时app.29ff4803e0ac98b32c1c.bundle.js的大小也减小了

模块标识符(Module Identifiers)

从上面的实践中我们发现我们其实是没有更改代码的但是文件中hash的值却变化了
根据官网的描述

这是因为每个 module.id 会基于默认的解析顺序(resolve order)进行增量。也就是说,当解析顺序发生变化,ID 也会随之改变。因此,简要概括:

main bundle 会随着自身的新增内容的修改,而发生变化。
vendor bundle 会随着自身的 module.id 的修改,而发生变化。
manifest bundle 会因为当前包含一个新模块的引用,而发生变化。
第一个和最后一个都是符合预期的行为 – 而 vendor 的 hash 发生变化是我们要修复的。幸运的是,可以使用两个插件来解决这个问题。第一个插件是 NamedModulesPlugin,将使用模块的路径,而不是数字标识符。虽然此插件有助于在开发过程中输出结果的可读性,然而执行时间会长一些。第二个选择是使用 HashedModuleIdsPlugin,推荐用于生产环境构建:

由于我们现在改的是webpack.dev.js,我们用来实践下
在plugins中添加如下代码

1
new webpack.NamedModulesPlugin(),

然后

1
npx webpack --config webpack.dev.js

看下打包效果

1
2
3
4
5
6
7
8
9
10
11
12
13
Hash: 29ff4803e0ac98b32c1c
Version: webpack 4.12.0
Time: 2813ms
Built at: 2018-06-14 17:57:59
Asset Size Chunks Chunk Names
app.29ff4803e0ac98b32c1c.bundle.js 1.17 MiB app [emitted] app
vendor.29ff4803e0ac98b32c1c.bundle.js 735 KiB vendor [emitted] vendor
0.29ff4803e0ac98b32c1c.bundle.js 10.9 KiB 0 [emitted]
1.29ff4803e0ac98b32c1c.bundle.js 11 KiB 1 [emitted]
2.29ff4803e0ac98b32c1c.bundle.js 10.1 KiB 2 [emitted]
app.29ff4803e0ac98b32c1c.bundle.css 233 bytes app [emitted] app
./index.html 524 bytes [emitted]
manifest.json 423 bytes [emitted]

可以修改下CounterComponet.jsx后在执行

1
npx webpack --config webpack.dev.js

再看下打包效果

1
2
3
4
5
6
7
8
9
10
11
12
13
Hash: 3cf568e90b38c1c3c339
Version: webpack 4.12.0
Time: 2709ms
Built at: 2018-06-14 17:59:00
Asset Size Chunks Chunk Names
app.3cf568e90b38c1c3c339.bundle.js 1.17 MiB app [emitted] app
vendor.3cf568e90b38c1c3c339.bundle.js 735 KiB vendor [emitted] vendor
0.3cf568e90b38c1c3c339.bundle.js 10.9 KiB 0 [emitted]
1.3cf568e90b38c1c3c339.bundle.js 11 KiB 1 [emitted]
2.3cf568e90b38c1c3c339.bundle.js 10.1 KiB 2 [emitted]
app.3cf568e90b38c1c3c339.bundle.css 233 bytes app [emitted] app
./index.html 524 bytes [emitted]
manifest.json 423 bytes [emitted]

结果还是都变化了,奇怪,我们试下生产环境的方式
将webpack.dev.js的相关的改动我们在webpack.prod.js中也做下修改,然后再试下【注意生产环境我们用new webpack.HashedModuleIdsPlugin()】
分别执行

1
npm run build

第一次输出类似如下

1
2
3
4
5
6
7
8
9
10
11
12
13
14
15
16
17
18
19
Hash: e0b25a1605f0da8569c1
Version: webpack 4.12.0
Time: 9622ms
Built at: 2018-06-14 18:14:57
Asset Size Chunks Chunk Names
1.62c80f16d58866af39d9.bundle.js.map 5 KiB 1 [emitted]
0.a81f2d5fe8a554f19db1.bundle.js 5.32 KiB 0 [emitted]
2.4bb6ea90727a9917c466.bundle.js 6.23 KiB 2 [emitted]
vendor.153d0cc454d09104782f.bundle.js 106 KiB 3 [emitted] vendor
app.e7d2f7719c957e5c378e.bundle.js 217 KiB 4 [emitted] app
main.e7d2f7719c957e5c378e.css 290 bytes 4 [emitted] app
0.a81f2d5fe8a554f19db1.bundle.js.map 4.13 KiB 0 [emitted]
1.62c80f16d58866af39d9.bundle.js 6.34 KiB 1 [emitted]
2.4bb6ea90727a9917c466.bundle.js.map 5.08 KiB 2 [emitted]
vendor.153d0cc454d09104782f.bundle.js.map 271 KiB 3 [emitted] vendor
app.e7d2f7719c957e5c378e.bundle.js.map 644 KiB 4 [emitted] app
main.e7d2f7719c957e5c378e.css.map 106 bytes 4 [emitted] app
./index.html 518 bytes [emitted]
manifest.json 845 bytes [emitted]

第二次我们修改CounterComponent.jsx,然后再试下结果输出类似如下

1
2
3
4
5
6
7
8
9
10
11
12
13
14
15
16
17
18
19
Hash: 3102790f92604ffd6406
Version: webpack 4.12.0
Time: 13758ms
Built at: 2018-06-14 18:17:58
Asset Size Chunks Chunk Names
1.62c80f16d58866af39d9.bundle.js.map 5 KiB 1 [emitted]
0.44264f48cf81d76c34f3.bundle.js 5.32 KiB 0 [emitted]
2.4bb6ea90727a9917c466.bundle.js 6.23 KiB 2 [emitted]
vendor.153d0cc454d09104782f.bundle.js 106 KiB 3 [emitted] vendor
app.2d7ccb1930e41d2c5c9b.bundle.js 217 KiB 4 [emitted] app
main.2d7ccb1930e41d2c5c9b.css 290 bytes 4 [emitted] app
0.44264f48cf81d76c34f3.bundle.js.map 4.13 KiB 0 [emitted]
1.62c80f16d58866af39d9.bundle.js 6.34 KiB 1 [emitted]
2.4bb6ea90727a9917c466.bundle.js.map 5.08 KiB 2 [emitted]
vendor.153d0cc454d09104782f.bundle.js.map 271 KiB 3 [emitted] vendor
app.2d7ccb1930e41d2c5c9b.bundle.js.map 644 KiB 4 [emitted] app
main.2d7ccb1930e41d2c5c9b.css.map 106 bytes 4 [emitted] app
./index.html 518 bytes [emitted]
manifest.json 845 bytes [emitted]

可以看出来变动的之后
0.xxxx.bundle.js这个文件
看来这个hash的变化针对的只是生产环境,不过这个也可以了,频繁改动只对生产环境的影响比较大

我们将生产环境的构建配置中的

1
new webpack.HashedModuleIdsPlugin()

替换为

1
new webpack.NamedModulesPlugin()

可以再试下,效果跟HashedModuleIdsPlugin是一样的只不过文件大小会有些差别

项目地址

1
2
https://github.com/durban89/webpack4-react16-reactrouter-demo.git
tag:v_1.0.10

继续之前的分享【Webpack4生产环境构建相关配置 - 指定环境

下面让我们用我们之前文章的项目来做下实践

1
2
git clone https://github.com/durban89/webpack4-react16-reactrouter-demo.git react-webpack-demo && cd react-webpack-demo
npm install

通常最好的做法是使用 ExtractTextPlugin 将 CSS 分离成单独的文件。

disable 选项可以和 –env 标记结合使用,以允许在开发中进行内联加载,推荐用于热模块替换和构建速度。

通过上面官网的描述我们知道,在生产中将样式文件单独出来是比较好的做法,下面实践下如何配置实现

1
npm install --save-dev extract-text-webpack-plugin@next

当前时间点如果执行

1
npm install --save-dev extract-text-webpack-plugin

会不符合当前webpack4这个版本,所以我们安装的时候使用上一个命令来安装,如果你在安装的时候版本已经释放的话,可以安装现在这个命令来进行安装

先来修改webpack.dev.js
plugins中追加

1
2
3
new ExtractTextPlugin({
filename: '[name].bundle.css',
}),

结果如下

1
2
3
4
5
6
7
8
9
10
11
12
13
14
plugins: [
new CleanWebpackPlugin(['dist']),
new HtmlWebpackPlugin({
title: 'React + ReactRouter Demo',
filename: './index.html', // 调用的文件
template: './index.html', // 模板文件
}),
new webpack.DefinePlugin({
'process.env.NODE_ENV': JSON.stringify('development'),
}),
new ExtractTextPlugin({
filename: '[name].bundle.css',
}),
],

还需要修改webpack.common.js

1
2
3
4
5
6
7
{
test: /\.css$/,
use: [
'style-loader',
'css-loader',
],
},

改为如下

1
2
3
4
5
6
7
{
test: /\.css$/,
use: ExtractTextPlugin.extract({
fallback: 'style-loader',
use: 'css-loader',
}),
},

执行

1
npm run start

我们会看到有如下输出

1
2
3
4
5
6
7
8
9
10
11
Version: webpack 4.12.0
Time: 4398ms
Built at: 2018-06-13 17:55:05
Asset Size Chunks Chunk Names
app.bundle.js 1.52 MiB app [emitted] app
0.bundle.js 10.9 KiB 0 [emitted]
1.bundle.js 11 KiB 1 [emitted]
2.bundle.js 10.1 KiB 2 [emitted]
app.bundle.css 0 bytes app [emitted] app
./index.html 397 bytes [emitted]
Entrypoint app = app.bundle.js app.bundle.css

现在app.bundle.css还没有内容,我们来加下样式
创建css/CounterComponnet.css,内容如下

1
2
3
4
5
6
7
8
9
10
11
12
13
14
15
16
17
18
.btn {
width: 60px;
height: 30px;
background: #673ab7;
font-size: 16px;
border: none;
border-radius: 2px;
outline: none;
color: #fff;
}

.btn:focus {
background: #3d51b5;
}

.btn.first-child {
margin-right: 5px;
}

修改src/components/CounterComponnet.jsx中的

1
2
<button onClick={this.props.doIncrement}>+</button>
<button onClick={this.props.doDecrement}>-</button>

改为

1
2
<button className="btn first-child" onClick={this.props.doIncrement}>+</button>
<button className="btn" onClick={this.props.doDecrement}>-</button>

创建css/main.css,加入如下代码

1
@import './CounterComponent.css';

src/index.jsx添加如下引入代码

1
import './css/main.css';

最后目录结构如下

1
2
3
4
5
6
7
8
9
10
11
12
13
14
15
16
17
18
19
20
21
22
23
24
25
26
27
28
29
30
31
├── LICENSE
├── README.md
├── index.html
├── package-lock.json
├── package.json
├── src
│ ├── App.jsx
│ ├── actions
│ │ ├── counter.js
│ │ └── index.js
│ ├── components
│ │ ├── AboutComponent.jsx
│ │ ├── AppComponent.jsx
│ │ ├── CounterComponent.jsx
│ │ ├── HomeComponent.jsx
│ │ ├── LoadingComponent.jsx
│ │ ├── RoleComponent.jsx
│ │ ├── TopicComponent.jsx
│ │ └── TopicsComponent.jsx
│ ├── css
│ │ ├── CounterComponent.css
│ │ └── main.css
│ ├── index.jsx
│ ├── reducers
│ │ ├── counter.js
│ │ └── index.js
│ └── routes.jsx
├── webpack.common.js
├── webpack.config.js
├── webpack.dev.js
└── webpack.prod.js

为了看出打包效果明显一点,重新启动打包程序

1
npm run start

看出打包的输出日志如下

1
2
3
4
5
6
7
8
9
10
11
Version: webpack 4.12.0
Time: 4721ms
Built at: 2018-06-13 17:53:01
Asset Size Chunks Chunk Names
app.bundle.js 1.52 MiB app [emitted] app
0.bundle.js 10.9 KiB 0 [emitted]
1.bundle.js 11 KiB 1 [emitted]
2.bundle.js 10.1 KiB 2 [emitted]
app.bundle.css 233 bytes app [emitted] app
./index.html 397 bytes [emitted]
Entrypoint app = app.bundle.js app.bundle.css

然后点击进入计数器页面

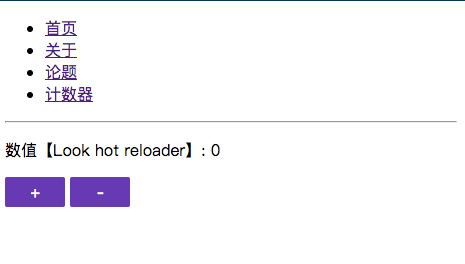
样式如下图

这里我为什么会把css单独放一个目录而且命名的方式跟组件的命名方式一样,原因是css在一个目录下比较好整合到一个css文件然后放在主入口,命名方式一样这样方便我们管理组件,这种结构化的方式会很好的提高我们的工作效率

项目地址

1
2
https://github.com/durban89/webpack4-react16-reactrouter-demo.git
tag:v_1.0.9
0%