Gowhich

Durban's Blog

1、为什么在发送请求的时候会收不到cookie

一般情况下我们会这样使用

1
2
3
4
5
6
7
8
9
10
11
12
13
const data = await fetch('/mall/point/exchangecheck', {
body: JSON.stringify(dataObj),
method: 'POST',
headers: {
'Content-Type': 'application/json',
},
}).catch(e => {
console.log(e);
toast({
'message': '网络异常'
});
});

针对这个情况我们要这样使用

1
2
3
4
5
6
7
8
9
10
11
12
13
const data = await fetch('/mall/point/exchangecheck', {
body: JSON.stringify(dataObj),
method: 'POST',
headers: {
'Content-Type': 'application/json',
},
credentials: "same-origin",
}).catch(e => {
console.log(e);
toast({
'message': '网络异常'
});
});

要加一下”credentials: “same-origin”

官方说明

credentials (String) - Authentication credentials mode. Default: “omit”

“omit” - don’t include authentication credentials (e.g. cookies) in the request

“same-origin” - include credentials in requests to the same site

“include” - include credentials in requests to all sites

2、iPhone4、iPhone5机型支持async/await

iPhone4、iPhone5机型支持async/await,即使我使用babel 7,我是在浏览器中直接引用,当然我也是使用了,自定义plugins的方式进行了调试,然后会出现另外其他的问题,针对具体如何使用的方式我会在另外一篇文章做分享。现针对这个问题说下我的解决方案。

1
2
3
4
5
6
7
8
9
10
11
12
13
14
15
16
17
18
19
20
21
22
23
24
25
26
27
28
29
30
31
32
33
34
35
36
const checkExchangeHandle = (id) => {
return fetch('/xxx/xxx/xxx', {
body: JSON.stringify({
'goods_id': id
}),
method: 'POST',
headers: {
'Content-Type': 'application/json',
},
credentials: "same-origin",
});
}

const exchangeHandle = (id) => {
checkExchangeHandle(id).then(data => {
data.json().then(o => {
console.log(o);

if (!o.success) {
throw new Error(o.message);
}

window.location.href='/xxx/xxx/xxxsuccess';
}).catch(e => {
console.log(e);
toast({
'message': e.message
});
});
}).catch(e => {
console.log(e);
toast({
'message': '网络异常'
});
});
}

其实调用方式类似于Promise的使用,这里使用的fetch方法是https://github.com/github/fetch提供的。兼容性还可以的。

最近拉取了京东结算订单csv文件,结果发现在用file_get_contents获取内容的时候,中文出现了乱码,感觉京东这么大,这个技术问题他们帮忙解决才好吧,想想还是算了,自己动动手的问题。

大概我也能猜到,京东的系统默认应该都不是utf-8的编码,大多数还是gbk或者是gb2312,因为之前使用过类似的国内产品,可能是由于历史原因,这个不深究了,

解决代码逻辑如下

1
2
3
4
5
6
7
8
9
10
11
12
13
14
15
16
17
18
19
20
21
22
23
24
25
26
27
28
29
30
31
32
33
34
35
36
$content = '';
$text = file_get_contents($file);

//$encodType = mb_detect_encoding($text);
define('UTF32_BIG_ENDIAN_BOM', chr(0x00) . chr(0x00) . chr(0xFE) . chr(0xFF));
define('UTF32_LITTLE_ENDIAN_BOM', chr(0xFF) . chr(0xFE) . chr(0x00) . chr(0x00));
define('UTF16_BIG_ENDIAN_BOM', chr(0xFE) . chr(0xFF));
define('UTF16_LITTLE_ENDIAN_BOM', chr(0xFF) . chr(0xFE));
define('UTF8_BOM', chr(0xEF) . chr(0xBB) . chr(0xBF));
$first2 = substr($text, 0, 2);
$first3 = substr($text, 0, 3);
$first4 = substr($text, 0, 3);
$encodType = "";
if (UTF8_BOM == $first3) {
$encodType = 'UTF-8 BOM';
} else if (UTF32_BIG_ENDIAN_BOM == $first4) {
$encodType = 'UTF-32BE';
} else if (UTF32_LITTLE_ENDIAN_BOM == $first4) {
$encodType = 'UTF-32LE';
} else if (UTF16_BIG_ENDIAN_BOM == $first2) {
$encodType = 'UTF-16BE';
} else if (UTF16_LITTLE_ENDIAN_BOM == $first2) {
$encodType = 'UTF-16LE';
}

//下面的判断主要还是判断ANSI编码的·
if ('' == $encodType) {
//即默认创建的txt文本-ANSI编码的
$content = iconv("GBK", "UTF-8", $text);
} else if ('UTF-8 BOM' == $encodType) {
//本来就是UTF-8不用转换
$content = $text;
} else {
//其他的格式都转化为UTF-8就可以了
$content = iconv($encodType, "UTF-8", $text);
}

继续【抛弃Redux,迎接React的hooks和context(一)】文章继续介绍一些新的东西

如果你还不知道什么情况的话,建议回到前面的文章看下,做下热身了解。

样式

前面的文章我们没有做关于样式太多的操作,这里我们简单的加一些样式,使得我们的应用能够更加具有导航性

  • 添加下面的样式到文件index.css
1
2
3
4
5
6
7
8
9
10
11
12
13
14
15
16
17
18
19
20
21
22
23
.episode-layout {
display: flex;
flex-wrap: wrap;
min-width: 100vh;
}

.episode-box {
padding: 0.5rem;
}

.header {
align-items: center;
background: white;
border-bottom: 1px solid black;
display: flex;
justify-content: space-between;
padding: .5rem;
position: sticky;
top: 0;
}
.header * {
margin: 0;
}
  • 在index.js文件中StoreProvider下面加入下面的代码
1
import './index.css';
  • 在App.jsx文件中,给<section>标签添加className属性,让className等于film-layout
  • <section>标签中的state.films.map里面的<section>添加className,让className等于film-box
  • 将最后的那个</div>,在</React.Fragment>标签上面的,移到<p>标签下面。
  • 最后给<div>标签添加属性className,让className等于header

最后App.jsx的代码如下

1
2
3
4
5
6
7
8
9
10
11
12
13
14
15
16
17
18
19
20
21
22
23
24
25
26
27
28
29
30
31
32
33
34
35
36
37
38
39
40
41
42
43
44
45
46
47
48
49
50
51
52
53
54
55
import React from 'react';
import { Store } from './Store';

function App() {
const { state, dispatch } = React.useContext(Store);

const fetchDataAction = async () => {
const data = await fetch('https://api.tvmaze.com/singlesearch/shows?q=rick-&-morty&embed=episodes');

const dataJson = await data.json();

return dispatch({
type: 'FETCH_DATA',
payload: dataJson._embedded.episodes
});
}

React.useEffect(() => {
state.films.length === 0 && fetchDataAction();
});

return (
<React.Fragment>
{console.log(state)}
<div className="header">
<h1>Example</h1>
<p>Favourite</p>
</div>
<section className="film-layout">
{
state.films.map(f => {
return (
<section key={f.id} className="film-box">
<img
src={f.image ? f.image.medium : ''}
alt={`Year and Date ${f.name}`}
/>
<div>
{f.name}
</div>
<section>
<div>
Season: {f.season} Number: {f.number}
</div>
</section>
</section>
)
})
}
</section>
</React.Fragment>
);
}

export default App;

让我们再次运行npm start,如果已经启动则不需要这个操作,会自动刷新

react context and hooks

添加功能

  • 仍然是在App.jsx文件中,在包含Season和Number的</div>标签下面添加下面的代码
1
<button type='button' onClick={() => toggleCreatorAction(f)}>ADD</button>
  • fetchDataAction函数下面添加toggleCreatorAction函数,其代码如下
1
2
3
4
5
6
const toggleCreatorAction = film => {
dispatch({
type: 'CREATOR_ADD',
payload: film
})
}

正如这里面写的,toggleCreatorAction函数返回一个dispatch,这个dispatch发送一个creator对象到store,你也许已经猜到了这个函数的功能。

  • 打开Store.js,在reducer人中添加下面这个case在default上面
1
2
3
4
5
case 'CREATOR_ADD':
return {
...state,
creators: [...state.creators, action.payload]
}

当点击按钮ADD的时候,CREATOR_ADD的case会更新creators数组,并将新的creator对象添加到creators中

  • 打开浏览器查看开发者工具,然后点击ADD按钮将会看到creators更新变化的情况

react context and hooks

删除功能

  • 修改toggleCreatorAction函数修改后代码如下
1
2
3
4
5
6
7
8
9
10
11
12
13
14
15
16
17
18
19
const toggleCreatorAction = film => {
const filmInCreator = state.creators.includes(film)

let dispatchObj = {
type: 'CREATOR_ADD',
payload: film,
}

if (filmInCreator) {
const filmWithoutCreator = state.creators.filter(creator => creator.id !== film.id)

dispatchObj = {
type: 'CREATOR_DEL',
payload: filmWithoutCreator,
}
}

return dispatch(dispatchObj)
}

filmInCreator用来检查creators中是否已经存在film,如果存在的话则进行删除操作,filmWithoutCreator用来移除存在的film,然后用新的filmWithoutCreator来更新creators数组。

  • 在Store.js中的reducer中添加一个新的case,代码如下
1
2
3
4
5
case 'CREATOR_DEL':
return {
...state,
creators: action.payload
}

上面的功能完成后,该有的功能都差不多了,但是为了向用户展示,正在发生的事情,我们需要再做一些事情

  • 修改App.jsx,修改header部分,修改后的代码如下
1
2
3
4
5
6
7
8
9
<header>
<div className="header">
<h1>Example</h1>
<p>Favourite</p>
</div>
<div>
Creator(s) {state.creators.length}
</div>
</header>
  • 修改组件,用下面的代码替换掉ADD
1
{state.creators.find(creator => creator.id === f.id) ? 'DEL' : 'ADD'}

这段代码使用了 array.find 方法,为了检查film对象的id是否存在于creators数组中,如果存在,则显示DEL

  • 小样式的修改,在<div>{f.name}</div>下面的<section>,给<section>标签添加一个style,代码如下
1
style={{ display: 'flex', justifyContent: 'space-between' }}

希望一切顺利,你有代码在浏览器中类似如下。

react context and hooks

分隔代码

前面做了一些基本逻辑上的实现操作,下面做一些关于代码拆分的操作

  • 创建一个新的文件,叫做FlimList.jsx,其代码如下
1
2
3
4
5
import React from 'react';

export default function FilmList(props) {
const { films, toggleCreatorAction, creators } = props;
}

你可能已经明白我们要做的事情了

  • 在App.jsx文件中,复制state.films.map的代码,然后粘贴到creators文件中。
  • FilmList.jsx中将state.films.map替换为return films.map
  • state.creators.find替换为creators.find

所有步骤做完后,FilmList.jsx文件中的代码看起来如下

1
2
3
4
5
6
7
8
9
10
11
12
13
14
15
16
17
18
19
20
21
22
23
24
25
26
27
import React from 'react';

export default function FilmList(props) {
const { films, toggleCreatorAction, creators } = props;

return films.map(f => {
return (
<section key={f.id} className="film-box">
<img
src={f.image ? f.image.medium : ''}
alt={`Year and Date ${f.name}`}
/>
<div>
{f.name}
</div>
<section style={{ display: 'flex', justifyContent: 'space-between' }}>
<div>
Season: {f.season} Number: {f.number}
</div>
<button type='button' onClick={() => toggleCreatorAction(f)}>
{creators.find(creator => creator.id === f.id) ? 'DEL' : 'ADD'}
</button>
</section>
</section>
)
})
}

suspense 和 lazy

  • 在App.jsx文件中加入下面的代码
1
const FilmList = React.lazy(() => import('./FilmList'));
  • <React.Suspense>嵌套标签<React.Fragment>
  • <React.Suspense>标签应该有下面这个属性
1
**fallback**={<div>Loading...</div>}
  • 移除<section className="film-layout">...</section>部分的代码,并用<FilmList {...props} />替换
  • 添加下面的代码在返回组件的上面
1
2
3
4
5
const props = {
films: state.films,
toggleCreatorAction,
creators: state.creators,
};

以上所有操作做完之后,保存代码并刷新浏览器应该会正常工作,并且在打开的时候会有一个’Loading…’状态

react context and hooks

参考自:https://medium.com/octopus-labs-london/replacing-redux-with-react-hooks-and-context-part-2-838fd20e6739

如果你使用React很长时间,Redux应该听说过。Redux是非常酷的,它是一种获取单独组件来改变和从主应用程序store中提取数据的方法,但是它不是非常容易入手的,尤其是新手。

有很多概念性的东西,比如reducers, actions, action creators,并且有一些方法,比如mapDispatchToPropsmapStateToProps,以及需要根据常规原因创建的一堆文件和文件夹。为了分享和改编数据需要做大量的工作。

随着Context API和hooks的引入,我们可以在我们的React应用程序中重新创建Redux,而无需实际安装redux和react-redux,本篇文章将演示下如何操作。

配置

前提确保已经安装Nodejs(我使用的版本是v10.15.0),然后使用create-react-app初始化一个app:

1
npx create-react-app no-redux-app

这个根据具体网络情况需要花一些时间,确实真的要好长时间

一旦初始化结束后,在no-redux-app这个目录下通过使用命令npm start来启动项目,会自动打开浏览器,并且会看到类如下图的页面

React hooks context

  • ctrl + c停止运行
  • 打开```package.json````文件,查看react和react-dom的版本号,如果是在16.7.0以上则可以使用hooks,如果不是请运行下面命令安装最新版本
1
$ npm i [email protected] [email protected]
  • 为了保证下面的操作清晰,我们把src下面除了App.js、index.js和index.css文件的其他文件
  • 修改index.js文件
1
2
3
4
5
6
7
8
9
10
11
import React from 'react';
import ReactDOM from 'react-dom';
import './index.css';
import App from './App.jsx';
import { StoreProvider } from "./Store";

ReactDOM.render(
<StoreProvider>
< App / >
</StoreProvider>
, document.getElementById('root'));
  • 将App.js重命名为App.jsx,并用下面的代码替换
1
2
3
4
5
6
7
8
9
10
11
12
13
14
import React from 'react';

function App() {
return (
<React.Fragment>
<div>
<h1>Example</h1>
<p>Favourite</p>
</div>
</React.Fragment>
);
}

export default App;

Redux概念

根据它的文档介绍,Redux能够概括为三个基本概念:storesactionsreducers

redux概念或者redx流程

  1. action只有一个事情就是触发state的改变,它通常返回一个带有typepayload的对象
1
2
3
function actionFunc(dispatch) {
return dispatch({type: 'COMPLETE_TODO', payload: 1})
}

这里的dispatch参数告诉操作该对象需要影响的store是什么,因为应用程序可以有多个reducers。这将在以后有意义。

  1. reducer指定store将受操作影响的部分。因为redux存储是不可变的,所以reducer返回一个替换当前store的新store。Reducers通常写为switch语句。
1
2
3
4
5
6
7
8
function visibilityFilter(state, action) {
switch (action.type) {
case 'SET_VISIBILITY_FILTER':
return action.payload;
default:
return state;
}
}
  1. store将所有应用程序数据保存在对象树中。Redux有一个store,但Facebook的Flux等其他state管理器可以拥有多个store。
1
2
3
4
5
6
7
{
visibilityFilter: 'SHOW_ALL',
todos: [
text: 'Consider using Redux',
completed: true,
]
}
  1. 应用程序中任何组件的组件都可以访问store,并可以通过触发action来更改store

下面用React自带的hooks和context实现下这个概念

创建Store

  • 在src目录下面创建一个Store.js文件

在这里,我们将使用react context来创建一个父组件,该组件将为其子组件访问它所拥有的数据。这里暂时不深入研究context,但基本上是有provider - consumer关系。provider拥有所有数据,consumer使用它(有意义)。

  • 添加下面的代码到Store.js文件中
1
2
3
4
5
6
7
8
9
import React from "react";

export const Store = React.createContext();

const initialState = {};

function reducer () {}

export function StoreProvider(props) {}

第3行创建了一个子组件将订阅的context对象。暂时跳过初始化state对象和reducer函数,先看下StoreProvider

  • 添加下面的代码到StoreProvider
1
2
3
export function StoreProvider(props) {
return <Store.Provider value='data from store'>{props.children}</Store.Provider>
}
  • 现在修改index.js文件并且从./Store导入StoreProvider
1
import { StoreProvider } from './Store';
  • 将组件放入到中,添加完的代码看起来类似如下
1
2
3
4
5
6
ReactDOM.render(
<StoreProvider>
<App />
</StoreProvider>,
document.getElementById('root')
);
  • 在App.jsx中导入Store,代码如下
1
import { Store } from './Store';
  • 在App函数中加入如下代码
1
const store = React.useContext(Store);

这里使用了第一个hooks,就是useContext。这将使组件可以访问context提供程序的value属性中的数据。

  • <React.Fragment>里面第一行添加{console.log(store)}
  • 启动程序打开浏览器,在开发工具控制台中将会看到```data from store````

hooks和context

如果你没有看到,请确认下你的代码是否跟我的一致

  • 文件结构

hooks和context

  • 代码结构
1
2
3
4
5
6
7
8
9
10
11
12
13
// index.js

import React from 'react';
import ReactDOM from 'react-dom';
import App from './App';
import { StoreProvider } from './Store';

ReactDOM.render(
<StoreProvider>
<App />
</StoreProvider>,
document.getElementById('root')
);

// Store.js

1
2
3
4
5
6
7
8
9
10
11
import React from 'react';

export const Store = React.createContext();

const initialState = {};

function reducer() {}

export function StoreProvider(props) {
return <Store.Provider value='data from store'>{props.children}</Store.Provider>;
}

// App.jsx

1
2
3
4
5
6
7
8
9
10
11
12
13
14
15
16
import React from 'react';
import { Store } from './Store';

export default function App() {
const store = React.useContext(Store);

return (
<React.Fragment>
{console.log(store)}
<div>
<h1>Example</h1>
<p>Favourite</p>
</div>
</React.Fragment>
);
}

创建Reducer

如果看到这里的话,说明前面的实现是你已动手实现了下,并且是没有问题的。下面继续更新代码

  • Store.js文件中,在initialState中加入下面的代码
1
2
3
4
const initialState = {
films: [],
favourites: [],
};

这是我们的初始store在添加任何新数据之前的样子。

  • 修改reducer函数看起来像这样
1
2
3
4
5
6
7
8
function reducer (state, action) {
switch(action.type) {
case 'FETCH_DATA':
return { ...state, films: action.payload };
default:
return state;
}
}

前面看到的reducer函数有两个参数,state - 运行时store中的数据,以及action - 返回的action对象。目前,我们的reducer有一个case ‘FETCH_DATA’,它将用传回的数据替换我们的films数组。如果调用了无效操作,则需要使用default关键字返回状态。

  • 在StoreProvider函数中,添加下面的代码
1
2
const [state, dispatch] = React.useReducer(reducer, initialState);
const value = { state, dispatch };

这里遇到了第二个hook,就是useReducer。它需要两个参数reducerinitialState。它返回一个数组,里面分别是state - store里面的数据和dispatch - 我们如何向reducer发送动作(反过来改变我们的state)。我希望这是有意义的。

然后,我们将新状态转换为对象,并将其分配给名为value的变量。基本上价值是相同的

1
2
3
4
const value = {
state: state,
dispatch: dispatch
}

但是可以在Javascript ES6及更高版本中编写更短的内容。

  • 在Store.Provider中用下面的代码替换value='data from store'
1
value={value}

现在我们可以将state和dispatch传递给子组件。

  • 修改App.jsx文件,将const store = React.useContext(Store)替换为const { state, dispatch } = React.useContext(Store);

现在更新控制台日志中的store以查看状态并查看控制台。

hooks和context

你应该看到它从Store.jsx中提取我们的initialState数据。现在让我们来处理一些数据。

创建Action

我们的redux概念的最后一块。

  • 修改App.jsx文件,再返回组件之前添加一个匿名函数,叫fetchDataAction
1
const fetchDataAction = async () => {}

我们将使用fetch api使用async/await从tvmazeapi获取数据。

  • 添加新代码到我们的新fetchDataAction函数中
1
2
3
4
5
6
7
8
9
10
const fetchDataAction = async () => {
const data = await fetch('https://api.tvmaze.com/singlesearch/shows?q=rick-&-morty&embed=episodes');

const dataJson = await data.json();

return dispatch({
type: 'FETCH_DATA',
payload: dataJson._embedded.episodes
});
}

我建议您在浏览器中访问api url并查看数据。episodes列表在_embedded之下。

我们返回dispatch方法,其type和payload的对象作为属性,以便我们的reducer将知道要执行的是什么情况。

我们希望每次页面加载时都运行fetchDataAction,所以让我们将它放在返回组件的上方的useEffect hook中。

1
2
3
React.useEffect(() => {
state.films.length === 0 && fetchDataAction();
});

上面的代码类似于componentDidMount。基本上应用程序加载,如果state.episodes为空(默认情况下),则运行fetchDataAction。

保存并刷新页面。查看开发工具控制台,您应该看到一些数据。

hooks和context

简而言之,这就是redux模式。某些情况触发了一个动作(在我们的例子中它是一个页面加载),动作在reducer中运行一个case,它反过来更新了store。现在让我们使用这些数据。

  • 修改App.jsx,在<p>Favourite</p>下面加入如下代码
1
2
3
4
5
6
7
8
9
10
11
12
13
14
15
16
17
18
19
20
21
22
<section>
{
state.films.map(f => {
return (
<section key={f.id}>
<img
src={f.image ? f.image.medium : ''}
alt={`Year and Date ${f.name}`}
/>
<div>
{f.name}
</div>
<section>
<div>
Season: {f.season} Number: {f.number}
</div>
</section>
</section>
)
})
}
</section>

这段代码基本上遍历我们的剧集数组中的对象(在用api填充数据之后),并用这些数据填充dom。随意添加或删除您选择的数据点。

hooks和context

参考自:https://medium.com/octopus-labs-london/replacing-redux-with-react-hooks-and-context-part-1-11b72ffdb533

tmux 是一款终端复用命令行工具,一般用于 Terminal 的窗口管理。tmux 可以在终端软件重启后通过命令行恢复上次的 session ,而终端软件则不行。tmux 简洁优雅、订制性强,学会之后也能在 Linux 上使用,有助于逼格提升。tmux 由于存在前缀快捷键,所以不存在快捷键冲突问题。

安装

安装方法可以去github上tmux具体了解安装方法,我这里只介绍mac下的安装方法

mac下安装使用下面这个命令

1
brew install tmux

安装完成后,运行 tmux 新建一个 tmux 的会话(session),此时窗口唯一的变化是在底部会出现一个 tmux 的状态栏。我们先按下 tmux 默认的前缀快捷键 ⌃b(注:⌃ 为 Mac 的 control 键) 将其激活为快捷键接收模式,再按下 % ,即可将当前窗口切分为左右两个窗格。

快捷键

一般情况下 tmux 中所有的快捷键都需要和前缀快捷键 ⌃b 来组合使用(注:⌃ 为 Mac 的 control 键),以下是常用的窗格(pane)快捷键列表,大家可以依次尝试下:

窗格操作

  • % 左右平分出两个窗格
  • " 上下平分出两个窗格
  • x 关闭当前窗格
  • { 当前窗格前移
  • } 当前窗格后移
  • ; 选择上次使用的窗格
  • o 选择下一个窗格,也可以使用上下左右方向键来选择
  • space 切换窗格布局,tmux 内置了五种窗格布局,也可以通过 ⌥1⌥5来切换
  • z 最大化当前窗格,再次执行可恢复原来大小
  • q 显示所有窗格的序号,在序号出现期间按下对应的数字,即可跳转至对应的窗格

窗口操作

  • c 新建窗口,此时当前窗口会切换至新窗口,不影响原有窗口的状态
  • p 切换至上一窗口
  • n 切换至下一窗口
  • w 窗口列表选择,注意 macOS 下使用 ⌃p⌃n 进行上下选择
  • & 关闭当前窗口
  • , 重命名窗口,可以使用中文,重命名后能在 tmux 状态栏更快速的识别窗口 id
  • 0 切换至 0 号窗口,使用其他数字 id 切换至对应窗口
  • f 根据窗口名搜索选择窗口,可模糊匹配

会话操作

  • $ 重命名当前会话
  • s 选择会话列表
  • d detach 当前会话,运行后将会退出 tmux 进程,返回至 shell 主进程,可以使用attach tmux attach恢复所有窗口

在 shell 主进程下运行以下命令可以操作 tmux 会话:

1
2
3
4
5
6
tmux new -s foo # 新建名称为 foo 的会话
tmux ls # 列出所有 tmux 会话
tmux a # 恢复至上一次的会话
tmux a -t foo # 恢复名称为 foo 的会话,会话默认名称为数字
tmux kill-session -t foo # 删除名称为 foo 的会话
tmux kill-server # 删除所有的会话

官方宣称certbot

使用EFF的Certbot在您的网站上自动启用HTTPS,部署Let’s Encrypt的证书。

Automatically enable HTTPS on your website with EFF’s Certbot, deploying Let’s Encrypt certificates.

给指定域名生成免费ssl证书方式

举个例子比如我要给我的www.gowhich.com生成证书可以使用如下,命令

1
certbot certonly --webroot -w /home/wwwroot/gowhich/web -d www.gowhich.com

1
certbot certonly --standalone --preferred-challenges http -d www.gowhich.com

前提,你的域名必须已经解析成功,是否解析成功可以通过下面命令测试

1
nslookup www.gowhich.com

会得到类似如下信息

1
2
3
4
5
6
Server:		172.18.0.1
Address: 172.18.0.1#53

Non-authoritative answer:
Name: www.gowhich.com
Address: xxx.xxx.xxx.xxx # ip地址

下面说生成证书的命令

第一个命令,certbot会到你项目创建一个文件,然后通过访问你的域名来访问进行网站验证,通过后则生成证书 第二个命令则是通过启动内部服务,来检测验证网站,最后生成一个证书

我个人的项目比较多,使用的语言也多,Yii开发的项目在使用第一个命令生成证书的时候是没有问题的,但是第一个命令在Flask开发的项目中会遇到问题,提示访问不了文件,可能是路由的问题导致的,暂时没有找到解决思路,但是我们不可能因为一个证书去修改一个项目,如果改的话我觉得也是大费周折,还好certbot提供了第二种方式,只不过会需要暂时停止80端口的访问,这个对于跟人项目而言问题还好不是很严重,所以这里推荐第二种命令的方式。

继续前面的文章使用TypeScript开发React应用(四)介绍了React+TypeScript应用的Jest单元测试

下面继续分享如何给组件添加状态管理

添加状态管理

此时,如果您使用React只获取一次数据并显示它,您可以认为自己完成了。 但是,如果您正在开发一个更具交互性的应用程序,那么您可能需要添加状态管理。

一般的状态管理

React本身就是一个用于创建可组合视图的有用库。 但是,React没有规定在整个应用程序中同步数据的任何特定方法。 就React组件而言,数据通过您在子元素上指定的道具向下流动。 其中一些道具可能是以这种或那种方式更新状态的功能,但是如何发生这是一个悬而未决的问题。

由于React本身并不专注于应用程序状态管理,因此React社区使用Redux和MobX等库。
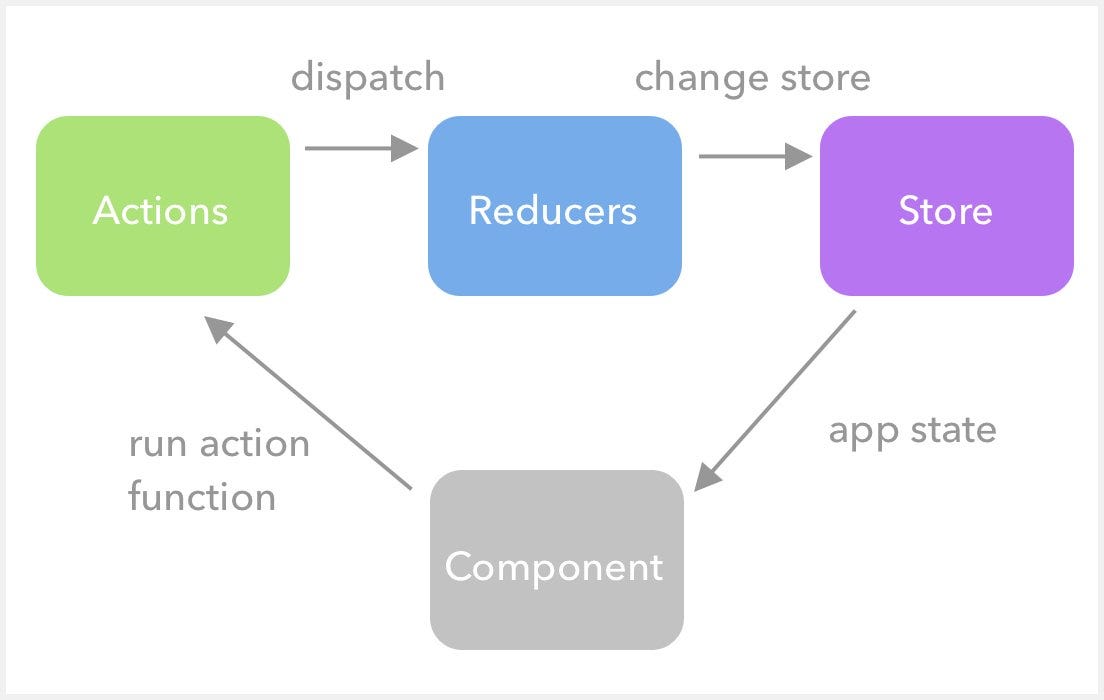
Redux依赖于通过集中且不可变的数据存储来同步数据,对该数据的更新将触发我们的应用程序的重新呈现。 通过发送必须由称为reducers的函数处理的显式操作消息,以不可变的方式更新状态。 由于具有明确的性质,通常更容易推断某个操作将如何影响您的程序状态。

MobX依赖于功能反应模式,其中状态通过可观察对象包裹并作为道具传递。 通过简单地将状态标记为可观察状态来保持状态完全同步以用于任何观察者。 作为一个很好的奖励,该库已经用TypeScript编写。

两者都有各种优点和权衡。 通常Redux倾向于看到更广泛的用法,因此为了本教程的目的,我们将专注于添加Redux; 但是,你应该感到鼓励去探索两者。

以下部分可能有一个陡峭的学习曲线。 我们强烈建议您通过其文档熟悉Redux

为行动做准备

除非我们的应用程序状态发生变化,否则添加Redux是没有意义的。 我们需要一个可以触发更改的操作源。 这可以是计时器,也可以是UI中的某个按钮。

出于我们的目的,我们将添加两个按钮来控制Hello组件的enthusiasmLevel。

安装Redux

要添加Redux,我们首先将redux和react-redux及其类型安装为依赖项。

1
npm install -S redux react-redux @types/react-redux

在这种情况下,我们不需要安装@types/redux,因为Redux已经附带了自己的定义文件(.d.ts文件)。

定义我们的应用程序状态

我们需要定义Redux将存储的状态的形状。 为此,我们可以创建一个名为src/types/index.tsx的文件,该文件将包含我们可能在整个程序中使用的类型的定义。

1
2
3
4
export interface StoreState {
enthusiasmLevel: number;
name: string;
}

我们的意图是enam将是这个应用程序名称,而enthusiasmLevel的管理将会有所不同。 当我们编写第一个容器时,我们会理解为什么我们故意使我们的状态与我们的道具略有不同。

添加actions

让我们从创建一组消息类型开始,我们的应用程序可以在src/constants/index.tsx中响应。

1
2
3
4
5
export const INCREMENT_ENTHUSIASM = 'INCREMENT_ENTHUSIASM';
export type INCREMENT_ENTHUSIASM = typeof INCREMENT_ENTHUSIASM;

export const DECREMENT_ENTHUSIASM = 'DECREMENT_ENTHUSIASM';
export type DECREMENT_ENTHUSIASM = typeof DECREMENT_ENTHUSIASM;

这种const/type模式允许我们以易于访问和可重构的方式使用TypeScript的字符串文字类型。

接下来,我们将创建一组可以在src/actions/index.tsx中创建这些操作的操作和函数。

1
2
3
4
5
6
7
8
9
10
11
12
13
14
15
16
17
18
19
20
21
22
23
import * as constants from '../constants';

export interface IncrementEnthusiasm {
type: constants.INCREMENT_ENTHUSIASM;
}

export interface DecrementEnthusiasm {
type: constants.DECREMENT_ENTHUSIASM;
}

export type EnthusiasmAction = IncrementEnthusiasm | DecrementEnthusiasm;

export function incrementEnthusiasm(): IncrementEnthusiasm {
return {
type: constants.INCREMENT_ENTHUSIASM,
}
}

export function decrementEnthusiasm(): DecrementEnthusiasm {
return {
type: constants.DECREMENT_ENTHUSIASM,
}
}

我们创建了两种类型来描述增量操作和减量操作应该是什么样子。 我们还创建了一个类型(EnthusiasmAction)来描述一个动作可以是增量或减量的情况。 最后,我们制作了两个函数来实际制作我们可以使用的动作,而不是写出庞大的对象文字。

这里有明显的样板,所以一旦你掌握了一些东西,你就可以随意查看像redux-actions这样的库。

添加一个reducer

我们准备好写第一个reducer了! Reducers只是通过创建应用程序状态的修改副本来生成更改的函数,但没有副作用。 换句话说,它们就是我们所谓的纯函数。

我们的reducer将在src/reducers/index.tsx下。 它的功能是确保增量将enthusiasmLevel提高1,而减量将enthusiasmLevel降低1,但水平从不低于1。

1
2
3
4
5
6
7
8
9
10
11
12
13
14
15
16
17
18
19
import { EnthusiasmAction } from '../actions';
import { StoreState } from '../types/index';
import { INCREMENT_ENTHUSIASM, DECREMENT_ENTHUSIASM } from '../constants/index';

export function enthusiasm(state: StoreState, action: EnthusiasmAction): StoreState {
switch (action.type) {
case INCREMENT_ENTHUSIASM:
return {
...state,
enthusiasmLevel: state.enthusiasmLevel + 1,
};
case DECREMENT_ENTHUSIASM:
return {
...state,
enthusiasmLevel: Math.max(state.enthusiasmLevel - 1, 1),
};
}
return state;
}

请注意,我们正在使用对象展开(...state),它允许我们创建状态的浅赋值,同时替换enthusiasmLevel。 重要的是,enthusiasmLevel属性是最后的,否则它将被旧状态的属性覆盖。

您可能想为reducers编写一些测试。 由于reducer是纯函数,因此可以传递任意数据。 对于每个输入,可以通过检查其新生成的状态来测试reducers。 考虑一下Jest的toEqual方法来实现这一点。

使用Redux编写时,我们经常会编写组件和容器。 组件通常与数据无关,并且主要在表示级别工作。 容器通常包装组件并向其提供显示和修改状态所需的任何数据。 您可以在Dan Abramov的文章演示和容器组件上阅读有关此概念的更多信息。

首先让我们更新src/components/Hello.tsx,以便它可以修改状态。 我们将为名为onIncrement和onDecrement的Props添加两个可选的回调属性:

1
2
3
4
5
6
export interface Props {
name: string;
enthusiasmLevel?: number;
onIncrement?: () => void;
onDecrement?: () => void;
}

然后我们将这些回调绑定到两个我们将添加到组件中的新按钮。

1
2
3
4
5
6
7
8
9
10
11
12
13
14
15
16
17
function Hello({ name, enthusiasmLevel = 1, onIncrement, onDecrement }: Props) {
if (enthusiasmLevel <= 0) {
throw new Error('You could be a little more enthusiastic.');
}

return (
<div className="hello">
<div className="greeting">
Hello {name + getExclamationMarks(enthusiasmLevel)}
</div>
<div>
<button onClick={onIncrement}>+</button>
<button onClick={onDecrement}>-</button>
</div>
</div>
);
}

一般来说,为onIncrement编写一些测试并在单击各自的按钮时触发onDecrement是个好主意。 试一试为您的组件编写测试。

现在我们的组件已更新,我们已准备好将其包装到容器中。 让我们创建一个名为src/containers/Hello.tsx的文件,并从以下导入开始。

1
2
3
4
5
import Hello from '../components/Hello';
import * as actions from '../actions/';
import { StoreState } from '../types';
import { connect } from 'react-redux';
import { Dispatch } from 'redux';

这里真正的两个关键部分是原始的Hello组件以及react-redux的connect函数。 connect将能够实际使用我们的原始Hello组件并使用两个函数将其转换为容器:

  • mapStateToProps,用于传递当前Sore中的数据到我们组件所需形状的一部分。
  • mapDispatchToProps创建回调属性,使用给定的调度函数将操作传送到我们的store。

如果我们回想一下,我们的应用程序状态包含两个属性:name和enthusiasmLevel。 另一方面,我们的Hello组件需要一个名字和一个enthusiasmLevel的管子。 mapStateToProps将从store获取相关数据,并在必要时针对我们组件的属性进行调整。 让我们继续写下来吧。

1
2
3
4
5
6
export function mapStateToProps({ enthusiasmLevel, name }: StoreState) {
return {
enthusiasmLevel,
name,
}
}

请注意,mapStateToProps仅创建Hello组件期望的4个属性中的2个。 也就是说,我们仍然希望传入onIncrement和onDecrement回调。 mapDispatchToProps是一个采用调度程序功能的函数。 此调度程序功能可以将操作传递到我们的store以进行更新,因此我们可以创建一对将根据需要调用调度程序的回调。

1
2
3
4
5
6
export function mapDispatchToProps(dispatch: Dispatch<actions.EnthusiasmAction>) {
return {
onIncrement: () => dispatch(actions.incrementEnthusiasm()),
onDecrement: () => dispatch(actions.decrementEnthusiasm()),
}
}

最后,我们准备调用connect。 connect将首先获取mapStateToProps和mapDispatchToProps,然后返回另一个我们可以用来包装我们组件的函数。 我们生成的容器使用以下代码行定义:

1
export default connect(mapStateToProps, mapDispatchToProps)(Hello);

完成后,我们的文件应如下所示:

1
2
3
4
5
6
7
8
9
10
11
12
13
14
15
16
17
18
19
20
21
import Hello from '../components/Hello';
import * as actions from '../actions/';
import { StoreState } from '../types/index';
import { connect } from 'react-redux';
import { Dispatch } from 'redux';

export function mapStateToProps({ enthusiasmLevel, name }: StoreState) {
return {
enthusiasmLevel,
name,
}
}

export function mapDispatchToProps(dispatch: Dispatch<actions.EnthusiasmAction>) {
return {
onIncrement: () => dispatch(actions.incrementEnthusiasm()),
onDecrement: () => dispatch(actions.decrementEnthusiasm()),
}
}

export default connect(mapStateToProps, mapDispatchToProps)(Hello);

创建store 我们回到src/index.tsx。 要把这些放在一起,我们需要创建一个具有初始状态的store,并使用我们所有的reducer进行设置。

1
2
3
4
5
6
7
8
9
import { createStore } from 'redux';
import { enthusiasm } from './reducers/index';
import { StoreState } from './types/index';
import { EnthusiasmAction } from './actions/index';

const store = createStore<StoreState, EnthusiasmAction, any, any>(enthusiasm, {
enthusiasmLevel: 1,
name: 'Durban',
});

正如您可能已经猜到的那样,store是我们应用程序全局状态的中央store。

接下来,我们将把./src/components/Hello与./src/containers/Hello交换使用,并使用react-redux的Provider将我们的道具与我们的容器连接起来。 我们将导入每个:

1
2
3
4
-import Hello from './components/Hello';
+import Hello from './containers/Hello';

import { Provider } from 'react-redux';

并将我们的store传递给Provider的属性:

1
2
3
4
5
6
ReactDOM.render(
<Provider store={store}>
<Hello />
</Provider>,
document.getElementById('root') as HTMLElement
);

请注意,Hello不再需要props,因为我们使用connect函数来调整我们的应用程序状态,以便包装Hello组件的props。

完整代码请跳转到这里下载 ts-react-app

继续前面的文章使用TypeScript开发React应用(三)介绍了React+TypeScript应用的搭建中如何创建状态组件

下面继续分享组件的单元测试

用Jest写测试

我们对Hello组件有一定的假设。 让我们重申它们是什么:

  • 当我们编写类似的内容时,组件应该渲染为类似<div>Hello Durban!!!</div>的内容。
  • 如果未指定passioniasmLevel,则组件应默认显示一个感叹号。
  • 如果passioniasmLevel为0或负数,则应该抛出错误。

我们可以使用这些要求为我们的组件编写一些测试。

但首先,让我们安装Enzyme。 Enzyme是React生态系统中的常用工具,可以更轻松地编写组件行为方式的测试。 默认情况下,我们的应用程序包含一个名为jsdom的库,允许我们模拟DOM并在没有浏览器的情况下测试其运行时行为。 Enzyme类似,但建立在jsdom上,可以更容易地对我们的组件进行某些查询。

让我们将其安装为开发时依赖项。

1
npm install -D enzyme @types/enzyme enzyme-adapter-react-16 @types/enzyme-adapter-react-16 react-test-renderer

注意我们安装了包enzyme以及@types/enzyme。 enzyme包是指包含实际运行的JavaScript代码的包,而@types/enzyme是包含声明文件(.d.ts文件)的包,因此TypeScript可以理解如何使用Enzyme。 您可以在此处了解有关@types包的更多信息。

我们还必须安装enzyme-adapter-react-16react-test-renderer。 这是enzyme预期安装的东西。

在编写第一个测试之前,我们必须配置Enzyme以使用React 16的适配器。我们将创建一个名为src/setupTests.ts的文件,在运行测试时自动加载,代码示例如下

1
2
3
4
5
6
import * as enzyme from 'enzyme';
import * as Adapter from 'enzyme-adapter-react-16';

enzyme.configure({
adapter: new Adapter()
});

现在我们已经设置了enzyme,让我们开始编写测试! 让我们创建一个名为src/components/Hello.test.tsx的文件,与之前的Hello.tsx文件相邻。

src/components/Hello.test.tsx

1
2
3
4
5
6
7
8
9
10
11
12
13
14
15
16
17
18
19
20
21
22
23
24
25
26
27
28
29
30
import * as React from 'react';
import * as enzyme from 'enzyme';
import Hello from './Hello';

it('renders the correct text when no enthusiasm level is given', () => {
const hello = enzyme.shallow(<Hello name='Durban' />);
expect(hello.find('.greeting').text()).toEqual('Hello Durban!');
});

it('renders the correct text with an explicit enthusiasm of 1', () => {
const hello = enzyme.shallow(<Hello name='Durban' enthusiasmLevel={1} />);
expect(hello.find('.greeting').text()).toEqual('Hello Durban!');
});

it('renders the correct text with an explicit enthusiasm of 5', () => {
const hello = enzyme.shallow(<Hello name='Durban' enthusiasmLevel={5} />);
expect(hello.find('.greeting').text()).toEqual('Hello Durban!!!!!');
});

it('throws when the enthusiasm level is 0', () => {
expect(() => {
enzyme.shallow(<Hello name="Durban" enthusiasmLevel={0} />);
}).toThrow();
});

it('throws when the enthusiasm level is negative', () => {
expect(() => {
enzyme.shallow(<Hello name='Durban' enthusiasmLevel={-1} />);
}).toThrow();
});

这些测试非常基础,但你应该能够掌握一切。

运行代码

1
npm run test

即可看到运行通过测试的结果

小提示

如果你在国内的话,建议将test的命令

1
"test": "react-scripts-ts test --env=jsdom",

改为

1
"test": "react-scripts-ts test --env=jsdom --watchman=false",

这个原因是因为。默认启动了watchman,watchman是需要连接国外的,如果在国内的话,会因为连接不上导致,看不到测试结果

运行后的结果类似如下

1
2
3
4
5
6
7
8
9
10
11
12
13
14
PASS  src/App.test.tsx
PASS src/components/Hello.test.tsx

Test Suites: 2 passed, 2 total
Tests: 6 passed, 6 total
Snapshots: 0 total
Time: 3.68s
Ran all test suites related to changed files.

Watch Usage
› Press p to filter by a filename regex pattern.
› Press t to filter by a test name regex pattern.
› Press q to quit watch mode.
› Press Enter to trigger a test run.

未完待续…

继续前面的文章使用TypeScript开发React应用(二)介绍了React+TypeScript应用的搭建中如何创建组件

下面继续分享创建状态组件

状态组件

我们之前提到我们的组件不需要状态。 如果我们希望能够根据用户的交互时间更新我们的组件会怎样? 那时,状态变得更加重要。

深入了解React中有关组件状态的最佳实践超出了本次分享的范围,但让我们快速查看Hello组件的有状态版本,看看添加状态是什么样的。我们将渲染两个<button>来更新Hello组件显示的感叹号的数量。

要做到这一点,我们需要做到下面几个步骤

  1. 为我们的状态定义一种类型(即this.state)
  2. 根据我们在构造函数中给出的props来初始化this.state。
  3. 为我们的按钮创建两个事件处理程序(onIncrement和onDecrement)。

实现代码如下

// src/components/StatefulHello.tsx

1
2
3
4
5
6
7
8
9
10
11
12
13
14
15
16
17
18
19
20
21
22
23
24
25
26
27
28
29
30
31
32
33
34
35
36
37
38
39
40
41
42
43
44
45
46
47
48
49
50
51
52
53
54
55
import * as React from 'react';

export interface Props {
name: string;
enthusiasmlevel?: number;
}

interface State {
currentEnthusiasmLevel: number;
}

class Hello extends React.Component<Props, State> {
constructor(props: Props) {
super(props);
this.state = {
currentEnthusiasmLevel: props.enthusiasmlevel || 1,
};
}

onIncrement = () => this.updateEnthusiasmLevel(this.state.currentEnthusiasmLevel + 1);

onDecrement = () => this.updateEnthusiasmLevel(this.state.currentEnthusiasmLevel - 1);

render() {
const {
name,
} = this.props;

if (this.state.currentEnthusiasmLevel <= 0) {
throw new Error('You could be a little more enthusiastic.');
}

return (
<div className="hello">
<div className="greeting">
Hello {name + getExclamationMarks(this.state.currentEnthusiasmLevel)}
</div>
<button onClick={this.onDecrement}>-</button>
<button onClick={this.onIncrement}>+</button>
</div>
);
}

updateEnthusiasmLevel(currentEnthusiasmLevel: number) {
this.setState({
currentEnthusiasmLevel,
});
}
}

export default Hello;

function getExclamationMarks(numberMarks: number) {
return Array(numberMarks + 1).join('!');
}

小提示

  1. 与Props非常相似,我们必须为我们的状态定义一种新类型:State
  2. 要在React中更新状态,我们使用this.setState - 我们不直接在构造函数中设置它。 setState只接受我们感兴趣的属性更新,我们的组件将根据需要重新呈现。
  3. 我们正在使用带箭头函数的类属性初始值设定项(例如 onIncrement = () => ...)。
  4. 将这些声明为箭头函数可避免孤立使用this
  5. 将它们设置为实例属性只会创建一次 - 常见的错误是在render方法中初始化它们,每次调用render时都会分配一个闭包。

我们不会在此分享中进一步使用此有状态组件。 有状态组件非常适合创建仅专注于呈现内容的组件(而不是处理核心应用程序状态)。 在某些情况下,它可以用于处理整个应用程序的状态,一个中心组件传递可以适当调用setState的函数; 但是,对于更大的应用程序,可能更喜欢专用的状态管理器(我们将在下面讨论)。

添加样式

给一个组件设置样式是很简单的。 要设置Hello组件的样式,我们可以在src/components/Hello.css中创建一个CSS文件。 src/components/Hello.css 内容如下

1
2
3
4
5
6
7
8
9
10
11
12
13
.hello {
text-align: center;
margin: 20px;
font-size: 48px;
font-family: 'Segoe UI', Tahoma, Geneva, Verdana, sans-serif;
}

.hello button {
margin-left: 25px;
margin-right: 25px;
font-size: 40px;
min-width: 50px;
}

create-react-app使用的工具(即Webpack和各种加载器)允许我们只导入我们感兴趣的样式表。当我们的构建运行时,任何导入的.css文件将被连接成一个输出文件。 所以在src/components/Hello.tsx中,我们将添加以下导入。

1
import './Hello.css';

运行npm run start看下页面吧,是不是样式也已经加载进去了。

未完待续…

继续前面的文章使用TypeScript开发React应用(一)介绍了基础的React+TypeScript应用的搭建

下面看下如何进行开发

创建组件

我们要写一个Hello组件。 该组件将采用我们想要问候的任何人的名字(我们称之为名称),以及可选的跟踪感叹号的数量(passioniasmLevel)。

当我们编写类似<Hello name="Daniel" enthusiasmLevel={3} />的内容时,组件应该渲染为类似<div>Hello Daniel!!!</div>的内容。 如果未指定enthusiasmLevel,则组件应默认显示一个感叹号。 如果enthusiasmLevel为0或负数,则应该抛出错误。

我们写一个Hello.tsx:

// src/components/Hello.tsx

1
2
3
4
5
6
7
8
9
10
11
12
13
14
15
16
17
18
19
20
21
22
23
24
25
26
import * as React from 'react';

export interface Props {
name: string;
enthusiasmLevel?: number;
}

function Hello({ name, enthusiasmLevel = 1 }: Props) {
if (enthusiasmLevel <= 0) {
throw new Error('You could be a little more enthusiastic.');
}

return (
<div className="hello">
<div className="greeting">
Hello {name + getExclamationMarks(enthusiasmLevel)}
</div>
</div>
);
}

export default Hello;

function getExclamationMarks(numberMarks: number) {
return Array(numberMarks + 1).join('!');
}

请注意,我们定义了一个名为Props的类型,它指定了我们的组件将采用的属性。 name是一个必需的字符串,而enthusiasmLevel是一个可选的数字(你可以从我们在其名字后面写出来的?)告诉你。

我们还将Hello编写为无状态函数组件(SFC)。 具体来说,Hello是一个函数,它接受Props对象,并挑选(或”析构”)它将传递的所有属性。 如果我们的Props对象中没有给出enthusiasmLevel,它将默认为1。

编写函数是React允许我们创建组件的两种主要方式之一。 如果我们想要,我们可以把它写成一个类,如下所示:

1
2
3
4
5
6
7
8
9
10
11
12
13
14
15
16
17
class Hello extends React.Component<Props, object> {
render() {
const { name, enthusiasmLevel = 1 } = this.props;

if (enthusiasmLevel <= 0) {
throw new Error('You could be a little more enthusiastic. :D');
}

return (
<div className="hello">
<div className="greeting">
Hello {name + getExclamationMarks(enthusiasmLevel)}
</div>
</div>
);
}
}

当我们的组件实例具有某种状态或需要处理生命周期钩子时,类很有用。 但是我们并不需要在这个特定的例子中考虑状态 - 事实上,我们在React.Component<Props, object>中将它指定为对象,所以编写SFC在这里更有意义,但重要的是要知道如何 写一个类组件。

请注意,该类扩展了React.Component<Props, object>。 这里的TypeScript特定位是我们传递给React.Component的类型参数:Props和object。 这里,Props是我们类的this.props的类型,object是this.state的类型。 我们将稍微返回组件状态。

现在我们已经编写了我们的组件,让我们将组件导入到index.tsx并用<Hello ... />的渲染替换我们的<App />渲染。

首先,我们将它导入文件的顶部:

1
import Hello from './components/Hello';

然后改变render函数的调用

1
2
3
4
ReactDOM.render(
<Hello name="Durban" enthusiasmLevel={3} />,
document.getElementById('root') as HTMLElement
);

类型断言

document.getElementById('root') as HTMLElement这行代码在语法上称为类型断言,有时也称为强制转换。当你比类型检查器更清楚时,这是告诉TypeScript表达式的真实类型的有用方法。

在这种情况下我们需要这样做的原因是getElementById的返回类型是HTMLElement | null。 简而言之,当getElementById找不到具有给定id的元素时,它返回null。 我们假设getElementById实际上会成功,所以我们需要使用as语法来说服TypeScript。

TypeScript还有一个尾随的”bang”语法(!),它从前一个表达式中删除null和undefined。 所以我们可以编写document.getElementById(‘root’)!,但在这种情况下我们想要更明确一些。

未完待续…

0%